Rainbow Flower Cinnamon Bread
Servings: 9
Calories: 953kcal
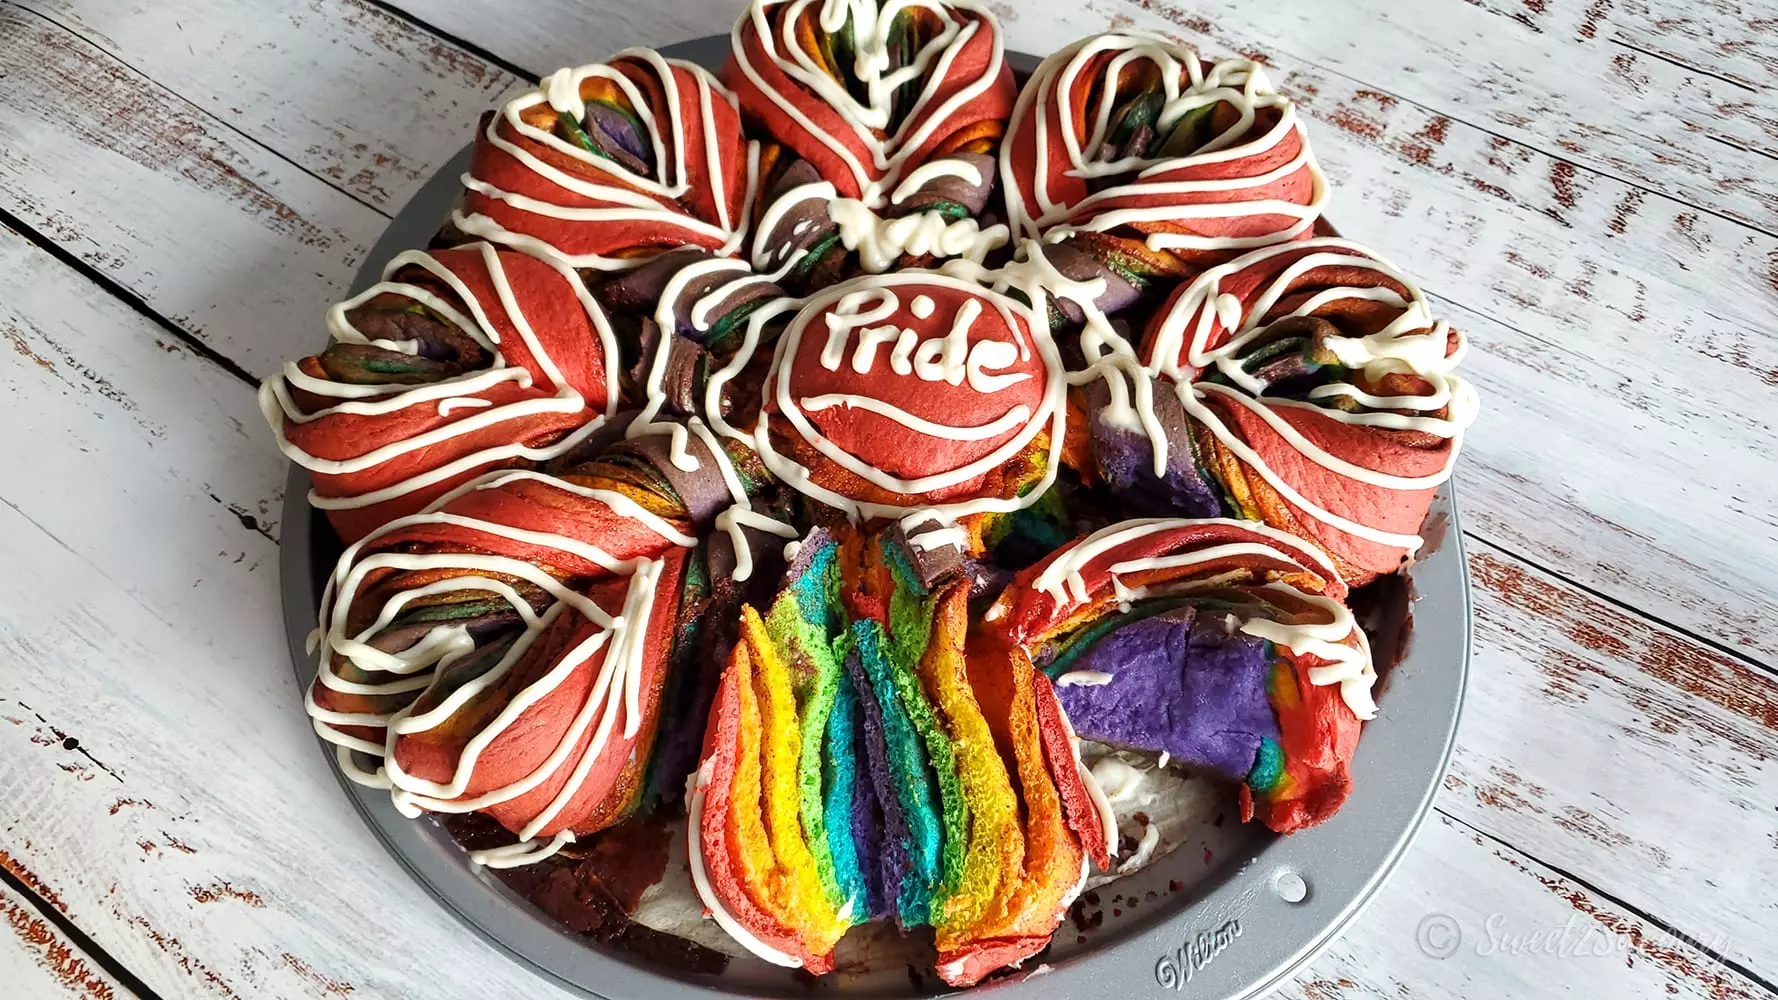
Soft rainbow flower bread with layers of cinnamon-brown sugar butter. A beautiful display of colours that make this bread (with heart shaped petals!) look sophisticated but is actually easier than you may think. This is a recipe especially dedicated to our #LGBTQ community.
Print Recipe
Equipment
Ingredients
Dough
- ½ cup unsalted butter
- ½ cup dark brown sugar packed
- ½ cup whole milk 3.25% M.F.
- 5 cups all-purpose flour sifted
- 2¼ teaspoon instant yeast
- ¼ teaspoon salt
- 3 large eggs
- 1 tablespoon vanilla extract
- ½ cup sour cream 14% M.F.
- 1 teaspoon vegetable oil for greasing
- 6 jars (0.5 oz) wilton icing colour gel purple, blue, green, yellow, orange, red
Filling
- 1 cup unsalted butter room temperature
- 1 cup dark brown sugar packed
- 2/4 teaspoon salt
- 2 tablespoons ground cinnamon
Icing
- ¾ cup cream cheese 32% M.F. | 55% moisture
- 1 cup powdered icing sugar
- 1 pinch salt
- 1 teaspoon vanilla extract
- ⅛ cup whole milk 3.25% M.F.
Extra
- ½ cup unsalted butter melted (for brushing on finished bread prior to baking)
Instructions
Dough
- In a small saucepan, on low heat melt together butter, dark brown sugar and milk while continuously stirring. Don't heat milk to point of bubbling. Remove from heat and set aside to cool (5 minutes)
- If your oven has a "Bread Proof" feature, turn this feature on to pre-heat the oven before you begin. If not, set your oven to the lowest temperature possible (usually 170°F or 76.7°C)
- In the bowl of a stand mixer with paddle attachment add flour, yeast, salt, eggs and vanilla extract. Stir on low for 2 minutes until ingredients are combined. Switch to dough hook and while on low speed, slowly pour in melted butter mixture and increase speed slightly to continue combining ingredients. Add sour cream and continue kneading dough for 10 minutes (no less). If kneading by hand, knead for 20 minutes minimum. Dough should be pliable and not stick to bowl or finger when pressed into dough. If too sticky, add 1/2 tablespoon of flour and test again. Repeat this if necessary until dough is not sticky but still pliable.
- Shape dough into ball and add 1 tsp of vegetable oil. Roll ball around in bowl until fully coated with oil. Cover with plastic wrap or clean tea towel and place in oven. If using bread proof feature, leave this setting on. If oven was set to 170°F, place covered bowl in oven and turn off heat (do not open oven during rise time to retain heat inside oven). Set timer for 1.5 h to proof dough for first rise.
Filling
- In a medium mixing bowl with a spoon or spatula mix together room temperature butter, brown sugar, salt, and cinnamon. Set aside.
Colour Dough
- Cut parchment paper to fit & line 12 inch pizza pan. Set aside
- Punch down dough with fingers to release gas bubbles. Lightly dust clean counter surface with all purpose flour and roll dough onto surface. Knead dough for 2 minutes. (sprinkle more flour onto surface if dough starts to stick to counter). Weigh dough on a food scale in grams. Divide this total weight by 6. This will be the weight of the 6 individual dough balls you need. Cut and weigh each dough ball to this amount. ( For example, if total weight is 1400 g, each dough ball should weigh 233 g). If you don't have a food scale, roll the dough into a large log and divide into 6 equal pieces. Roll each piece into a ball, set aside away from main work area and cover the dough balls with a clean tea towel.
- Start with purple colour gel. Use the tip of a knife to scoop out a tiny amount of colour approximately the size of a pin head (gel colours are strong. Start by using a small amount and add more if needed). While wearing food safe gloves, make an indentation into the center of the dough with your thumbs. Smear the colour into the center and fold in the sides to seal the dough.
- Place into the clean bowl of a stand mixer with paddle attachment and mix on medium low speed until colour is evenly blended with dough. If kneading by hand, knead on a waterproof cutting board ( lightly dusted with flour) until colour is evenly blended. Place back with the rest of the dough balls and cover with tea towel. Wipe bowl & paddle clean with a damp paper towel.
- Repeat step #3 & #4 (in order) for colour: blue, green, yellow, orange, red
Assemble Layers
- Lightly dust work surface with flour. With a rolling pin, roll out purple dough ball to an 11 inch or 12 inch diameter disc. Place on cut out parchment paper (without pizza pan) and use a 10 inch round bowl or plate to center and lightly press round circle into dough disc.
- Add 2 or 3 tablespoons of cinnamon butter within the circle of the dough disc. Use an angled spatula to spread the cinnamon butter evenly within the circle. Set aside.
- Repeat step #1 & #2 in order of colour: blue, green, yellow, orange, red and stack each layer ending with the red dough layer.
Style Flower Bread
- Keep 10 inch bowl centered on the top red layer. Use a sharp serrated knife to cut around the bowl to trim excess dough, resulting in a perfect layered "pancake" stack (make sure not to cut the parchment paper in the process). Save excess dough trim and roll into a bun to bake (if you have left-over cinnamon butter, brush the surface with it)
- Use a small round drinking glass (2 inch in diameter) and lightly press a circle centered into the top red dough layer. Starting from the outside of the small 2 inch centered circle, with a serrated knife, press down all the way through the layers at 12 o'clock, 3 o'clock, 6 o'clock and 9 o'clock. This will leave you with 4 even cut quarters (careful not to cut the parchment paper)
- Next, repeat the cutting process starting from the outside of the small 2 inch centered circle and cutting a line outward and all the way through the layers by dividing each quarter in half. This will leave you with 8 'pieces of the pie'.
- Lastly, cut each pie slice in half again and this will leave you with 16 'pieces of the pie'.
- Work quickly and start at 6 o'clock, lift one piece up and twist to the right 2 times. Place back down. Lift the next piece to the left and twist 2 times to the left. Place back down and pinch the right as well as the left twisted "petals" together. Repeat this step until all of the cut pieces are formed into 8 bread petals. Carefully slide flower bread onto pizza pan.
- Cover flower bread with clean tea towel and allow a second rise for 1 hour (you can use the bread proof oven feature or the 170°F method again). The same proofing can be done for the excess trim roll(s).
- Remove bread from oven and pre-heat oven to 325°F or 163°C. Brush or dab melted butter to cover the entire flower bread. Do this for the excess trim roll(s) as well (placed on a separate bake tray lined with parchment paper). Bake bread for 40 minutes. (20 minutes on middle shelf, then 20 minutes on bottom shelf). Allow to cool for 15 minutes.
Icing
- In a medium mixing bowl whip together cream cheese, powdered icing sugar, vanilla extract, salt and milk. Add icing to piping bag or a large zip top freezer bag with the corner cut and pipe icing onto flower bread. The design is up to you. Enjoy!!
Video
Notes
What type of food colour should I use?
Use gel food colour such as Wilton's Icing colour gel set. Food colour gel is stronger in hue than liquid colour drops (after baking, liquid food colour tends to fade). If you're not a fan of food colour, you can omit this.
Can I use another filling instead of cinnamon-brown sugar?
Absolutely! My suggestion for alternate fillings: hazelnut chocolate spread (ie. Nutella), any flavoured jam or peanut butter.
Do I have to knead food colour in by hand?
You can if you choose to (just make sure to use food safe gloves, because gel colour can be tough to wash off skin) and also knead on a waterproof cutting board so your counter does not get coloured in the process. Alternatively, you can use a mixer with paddle attachment. The paddle kneaded food colour more evenly. Don't over knead the dough though because this could over work the gluten resulting in a hard crust and dry interior
How do you get such even layers of dough?
The nerd in me came out..or shall we say perfectionist? The total weight of the dough after the first rise and after it had been punched down was 3.09 lbs (1400 g). Divide this by 6 (for the 6 layers of colour) and cut / weigh each piece of dough at 1/2 lb each (233 g). I love using my food scale for this exact reason. For baking in general I prefer to weigh my ingredients instead of measuring when possible. This achieves a few things. One is that your dough will roll out nice and even, second it allows the layers to rise at the same height / width and third, you end up with beautiful, even rainbow layers.
How can I achieve a soft texture in the bread?
In order to have a softer bread, the dough needs to develop gluten. The gluten is developed via the wheat protein in the flour. The higher the protein content, the more gluten develops. Bread flour has higher protein than All-purpose flour, however, due to a shortage of bread flour available at the grocery store (thanks to panic buyers), I had to resort to all-purpose flour and improvised by adding sour cream to keep dough soft. Also, remember to knead dough for at least 10 minutes (this will help gluten form once the flour is mixed with wet ingredients). If kneading by hand, at least 20 minutes to form the gluten for a softer bread texture. Don't take any shortcuts on this as this will determine the softness of your bread.
How should I store the bread?
After bread has cooled, any left-over bread should be stored in an airtight container on your counter between 1 to 2 days or refrigerated up to 7 days (frozen up to 3 months). If you prefer to keep the bread as soft as possible, I would even suggest to wrap each "petal" tightly with plastic wrap before storing in airtight container or freezer bag. Keep in mind that this won't prevent it from drying out over time but at least this method will help reduce the chances of it drying out quickly. To reheat, (after removing all wrappings) use the microwave if only reheating 1 or 2 'bread petals'. Spread a little bit of unsalted butter over the surface of the bread and microwave for 1 minute. If it's still cold or frozen, continue to reheat at 30 second intervals and keep checking until the bread is soft again. If reheating in the oven, set oven temperature to 325°F (163°C) and bake for about 5 to 10 minutes or until soft again.
Nutrition
Calories: 953kcal | Carbohydrates: 107g | Protein: 13g | Fat: 53g | Saturated Fat: 32g | Cholesterol: 200mg | Sodium: 319mg | Potassium: 255mg | Fiber: 4g | Sugar: 51g | Vitamin A: 1706IU | Vitamin C: 1mg | Calcium: 132mg | Iron: 4mg
