
1.8K 


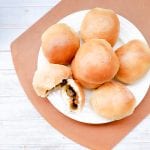

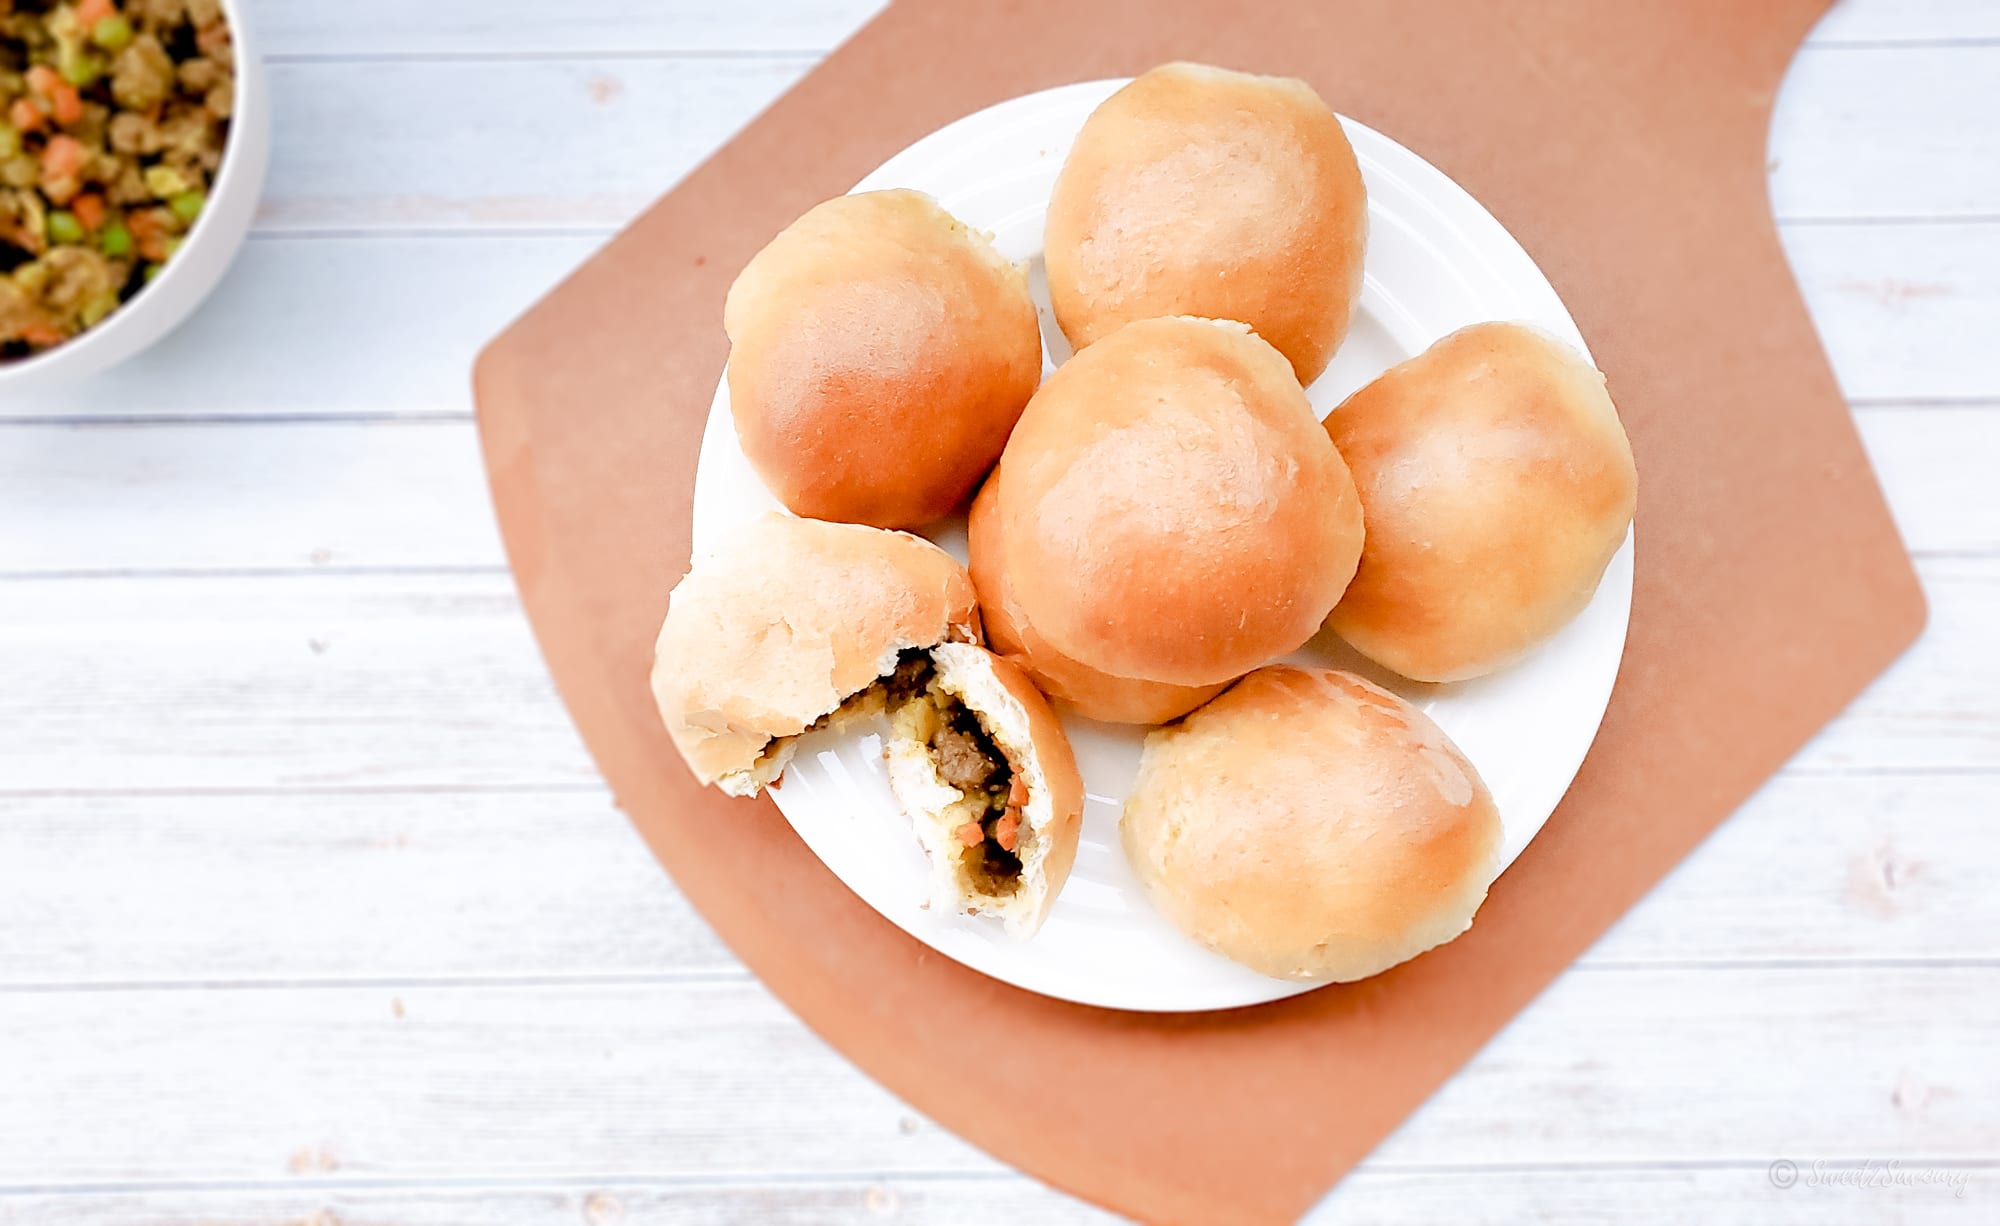
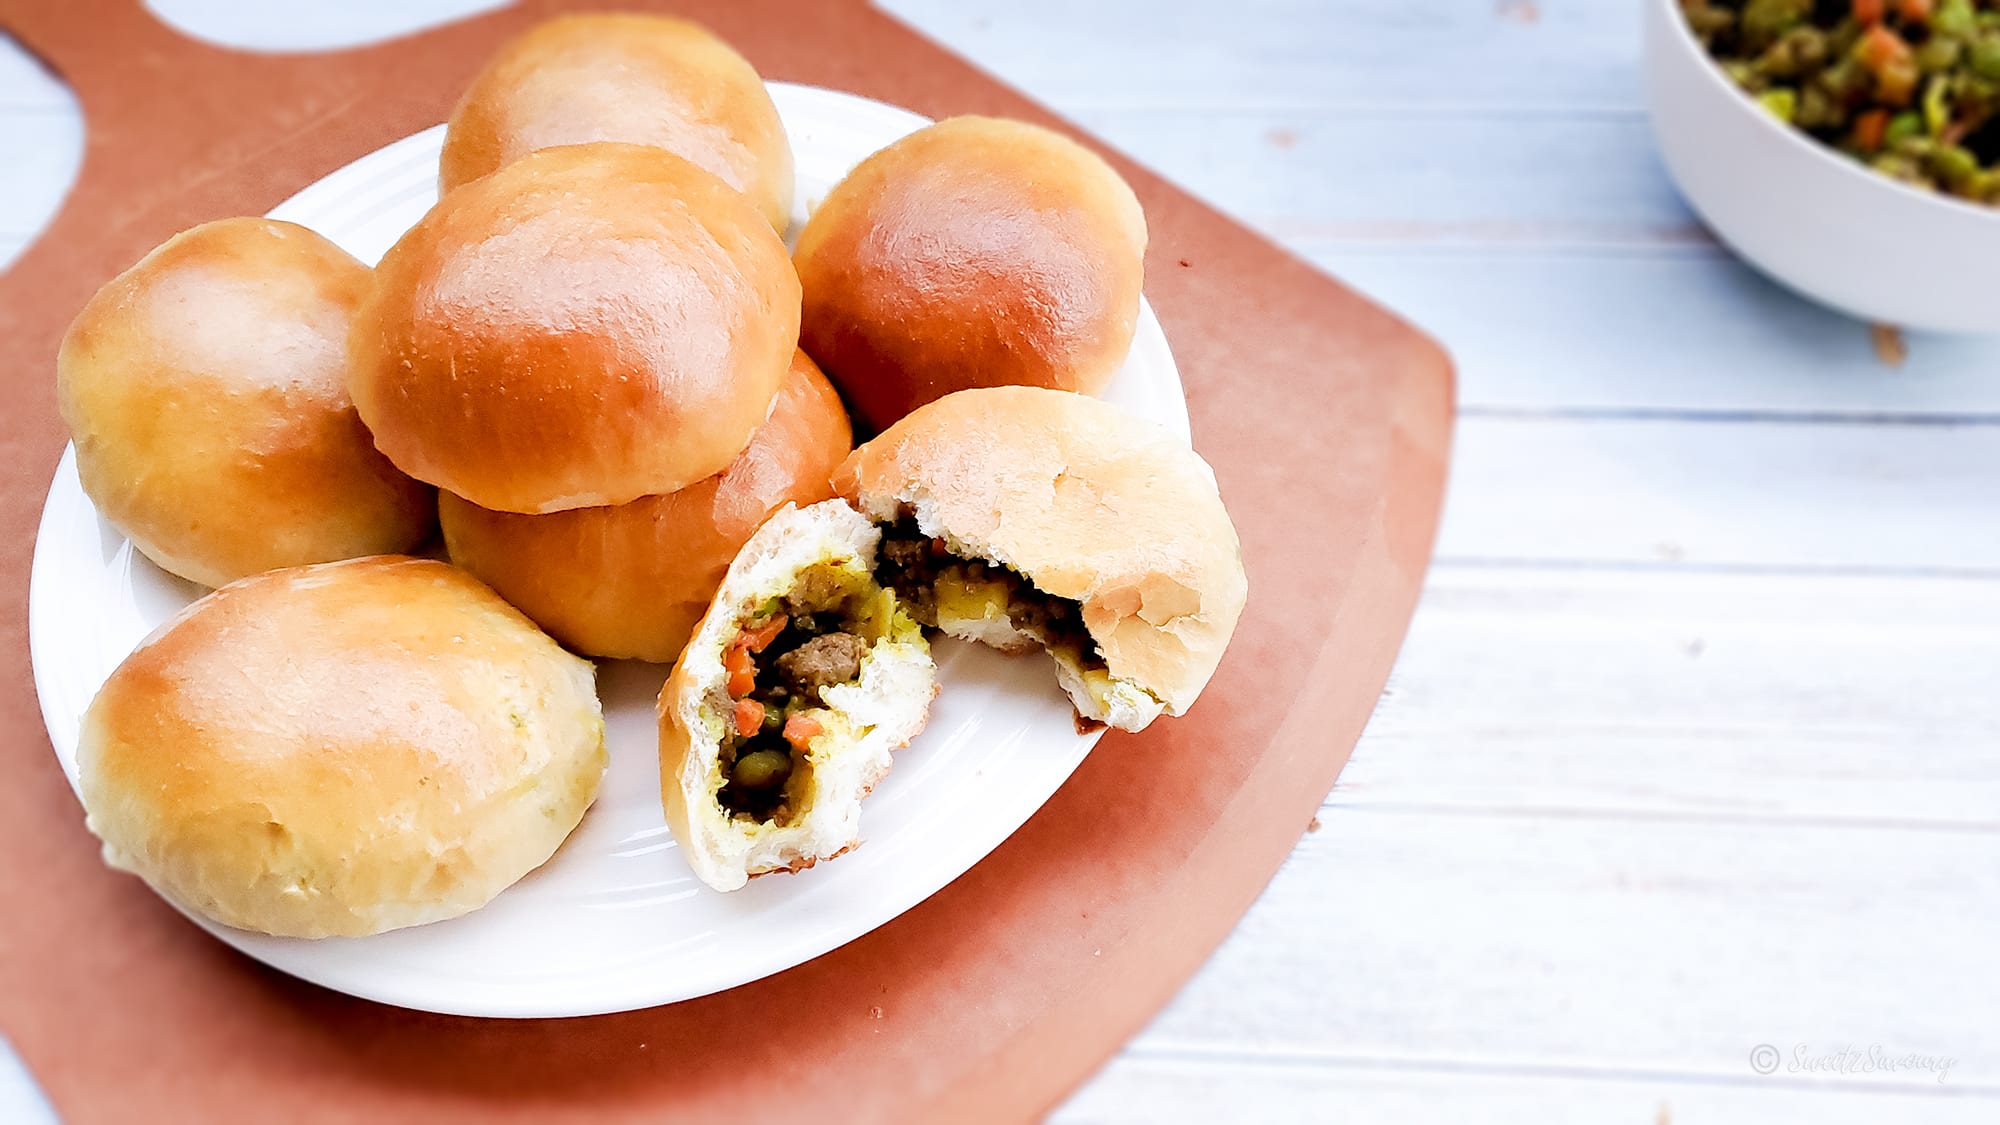
Soft Curry Beef Buns
Soft, fluffy milk bread with a light chew that is filled generously with delicious curry beef combined with sweet peas, carrots and potatoes. Freezer friendly and easy to re-heat for a quick bite on a busy day.
Print Pin Rate Yields: 20 buns
Ingredients
Filling
- 2 Tablespoons vegetable oil
- 2 cups yellow onion (1 large), peeled & diced
- 2 pounds lean ground beef
- 2 cups carrots (3 large), peeled & diced
- 3 cups yellow potatoes (3 large), peeled & diced
- 2 cups frozen green peas
- 1 large white or yellow onion, diced
- 4 Tablespoons curry powder
- 1 Tablespoon sea or kosher salt
- 1 teaspoon ground mustard
- ½ teaspoon ground coriander
- ½ teaspoon ground turmeric
- 2 Tablespoons brown sugar
- ¼ cup water
Cornstarch Slurry
- 2 Tablespoons cornstarch,
- 3 Tablespoons water
Dough
- 4 cups bread flour, sifted
- 1 cup cake flour, sifted
- ⅓ cup white sugar
- 2¼ teaspoon quick rise or instant yeast, (1 envelope)
- 2 Tablespoons instant skim milk powder (with vitamin A & D)
- 1½ teaspoon sea salt
- 1⅔ cup whole Milk (3.25% homogenized), room temperature
- 1 large egg, room temperature
Egg wash
- 1 large egg, beaten
- 1 Tablespoon water
INSTRUCTIONS
Filling
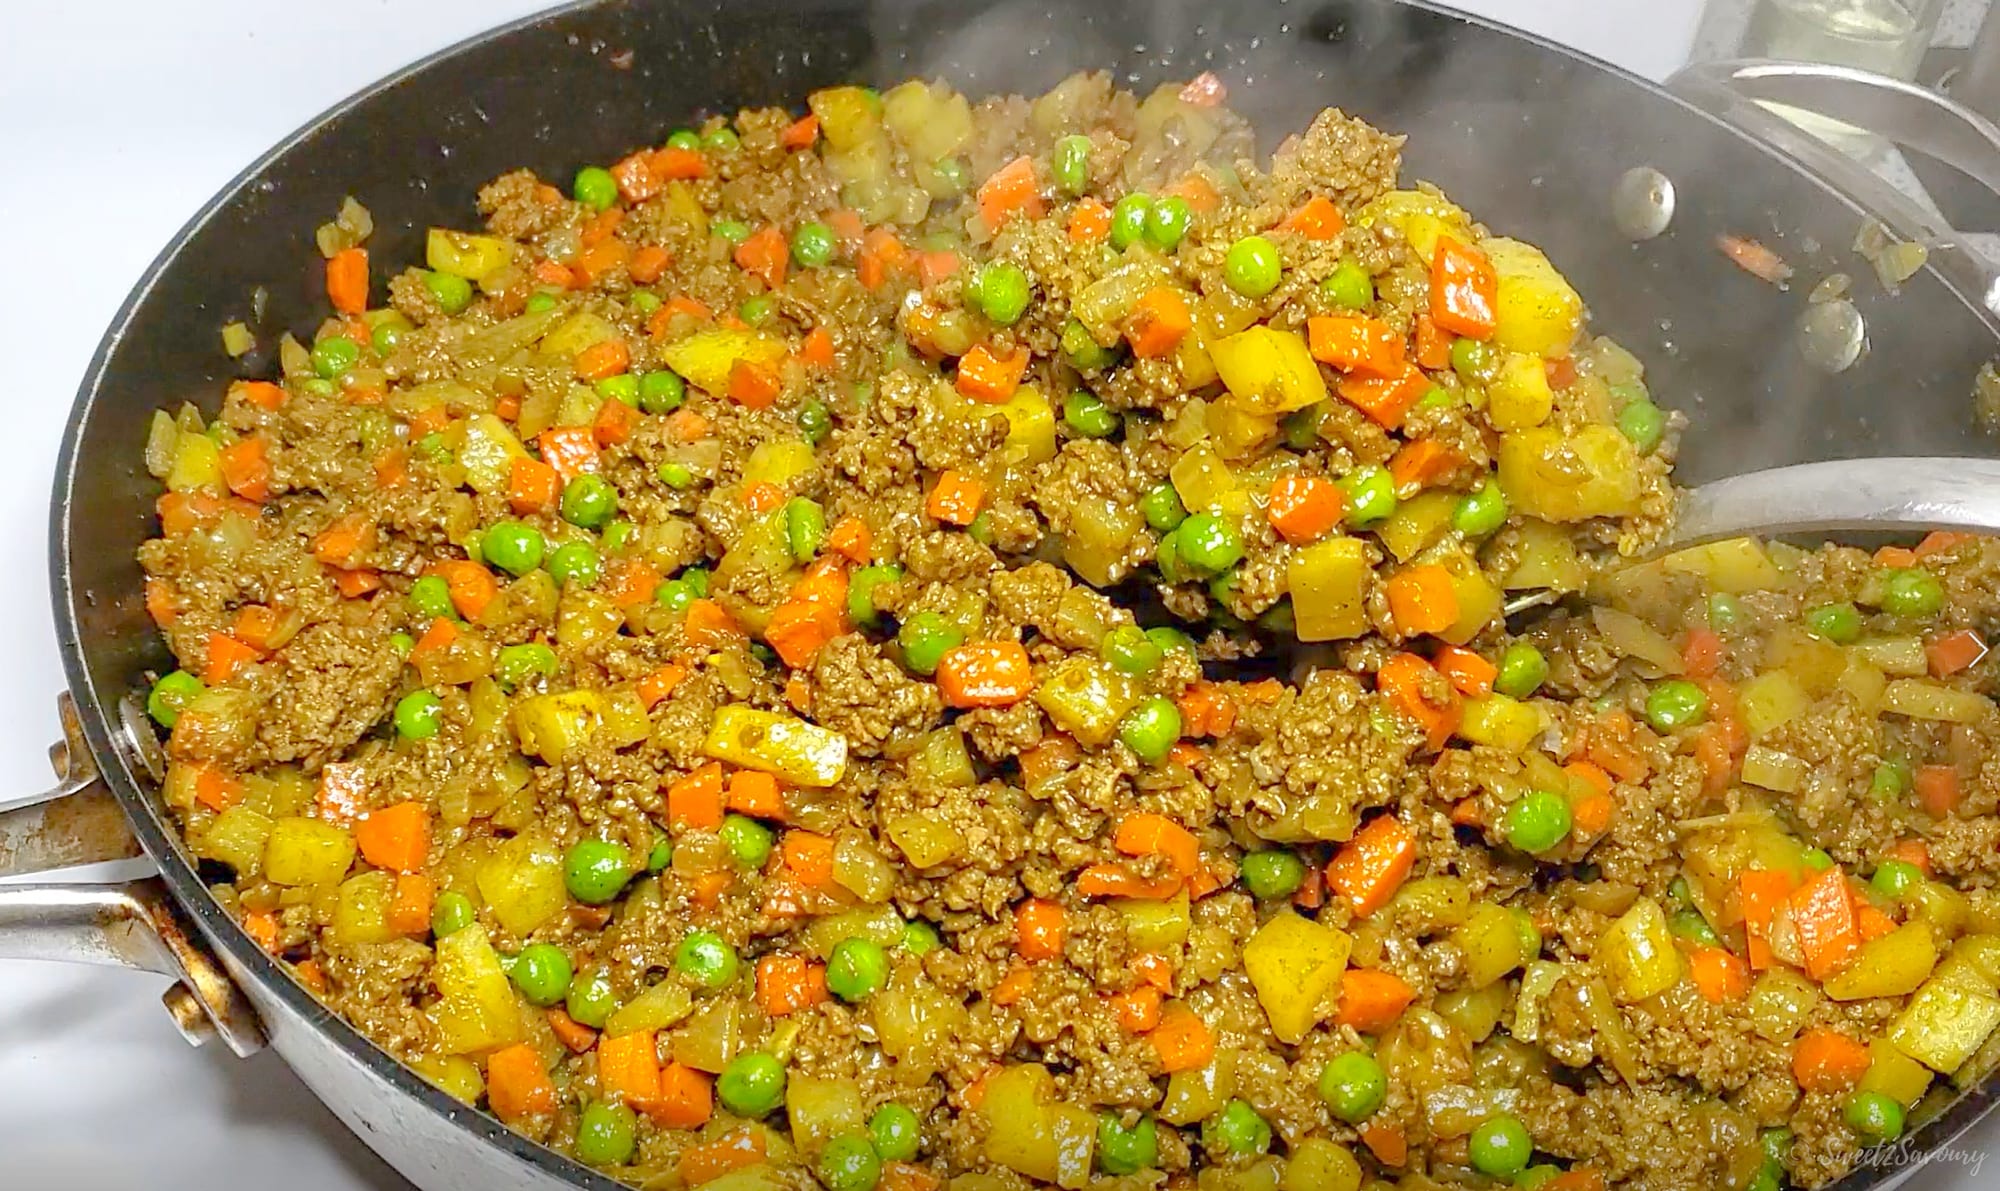
- In a large non-stick skillet, heat vegetable oil on high heat. Add diced onions, cook until soft and translucent. Add ground beef and continue to sauté meat for 4 minutes (should be slightly undercooked beef). Scoop meat into a large bowl, set aside and place skillet back on stove top on high-heat.
- Add diced potatoes to skillet, cook for 3 minutes then add diced carrots and continue to sautée for another 3 minutes. Reduce heat to medium high. Add cooked ground beef back into skillet, add salt and mix to combine. Add curry powder, ground mustard, ground turmeric and brown sugar. Continue to stir for 3 minutes. Add frozen peas, 1/4 cup water and continue to mix for another 5 minutes.
- In a small bowl, mix together cornstarch and water. Pour cornstarch slurry into meat and continue to cook meat filling for 2 minutes or until cornstarch has thickened. Transfer filling to a large bowl and set aside to cool for 10 minutes. Cover with cling wrap and place in fridge for 1 hour.
Dough
- If your oven has a "Bread Proof" feature, start it before you begin. If not, set oven to lowest temperature possible (usually 170°F or 76.7°C) to preheat oven.
- In a large mixing bowl whisk together cake flour, bread flour, sugar, instant yeast, instant skim milk powder and sea salt. Add half of this flour mix into the bowl of a stand mixer with paddle attachment.
- On low speed, slowly pour in milk until flour and milk are combined. Add 1 egg and continue to mix on low until egg is incorporated. Switch to dough hook, add remaining flour mix and knead dough on low for 5 minutes then increase speed to medium-low speed. Knead dough for 15 minutes. (not less). If mixing by hand, knead for 25 minutes. Mix in 1 tablespoon cake flour if dough appears too sticky to touch or knead in 1 tablespoon milk if dough appears too dry. Dough should be pliable but not stick to bowl.
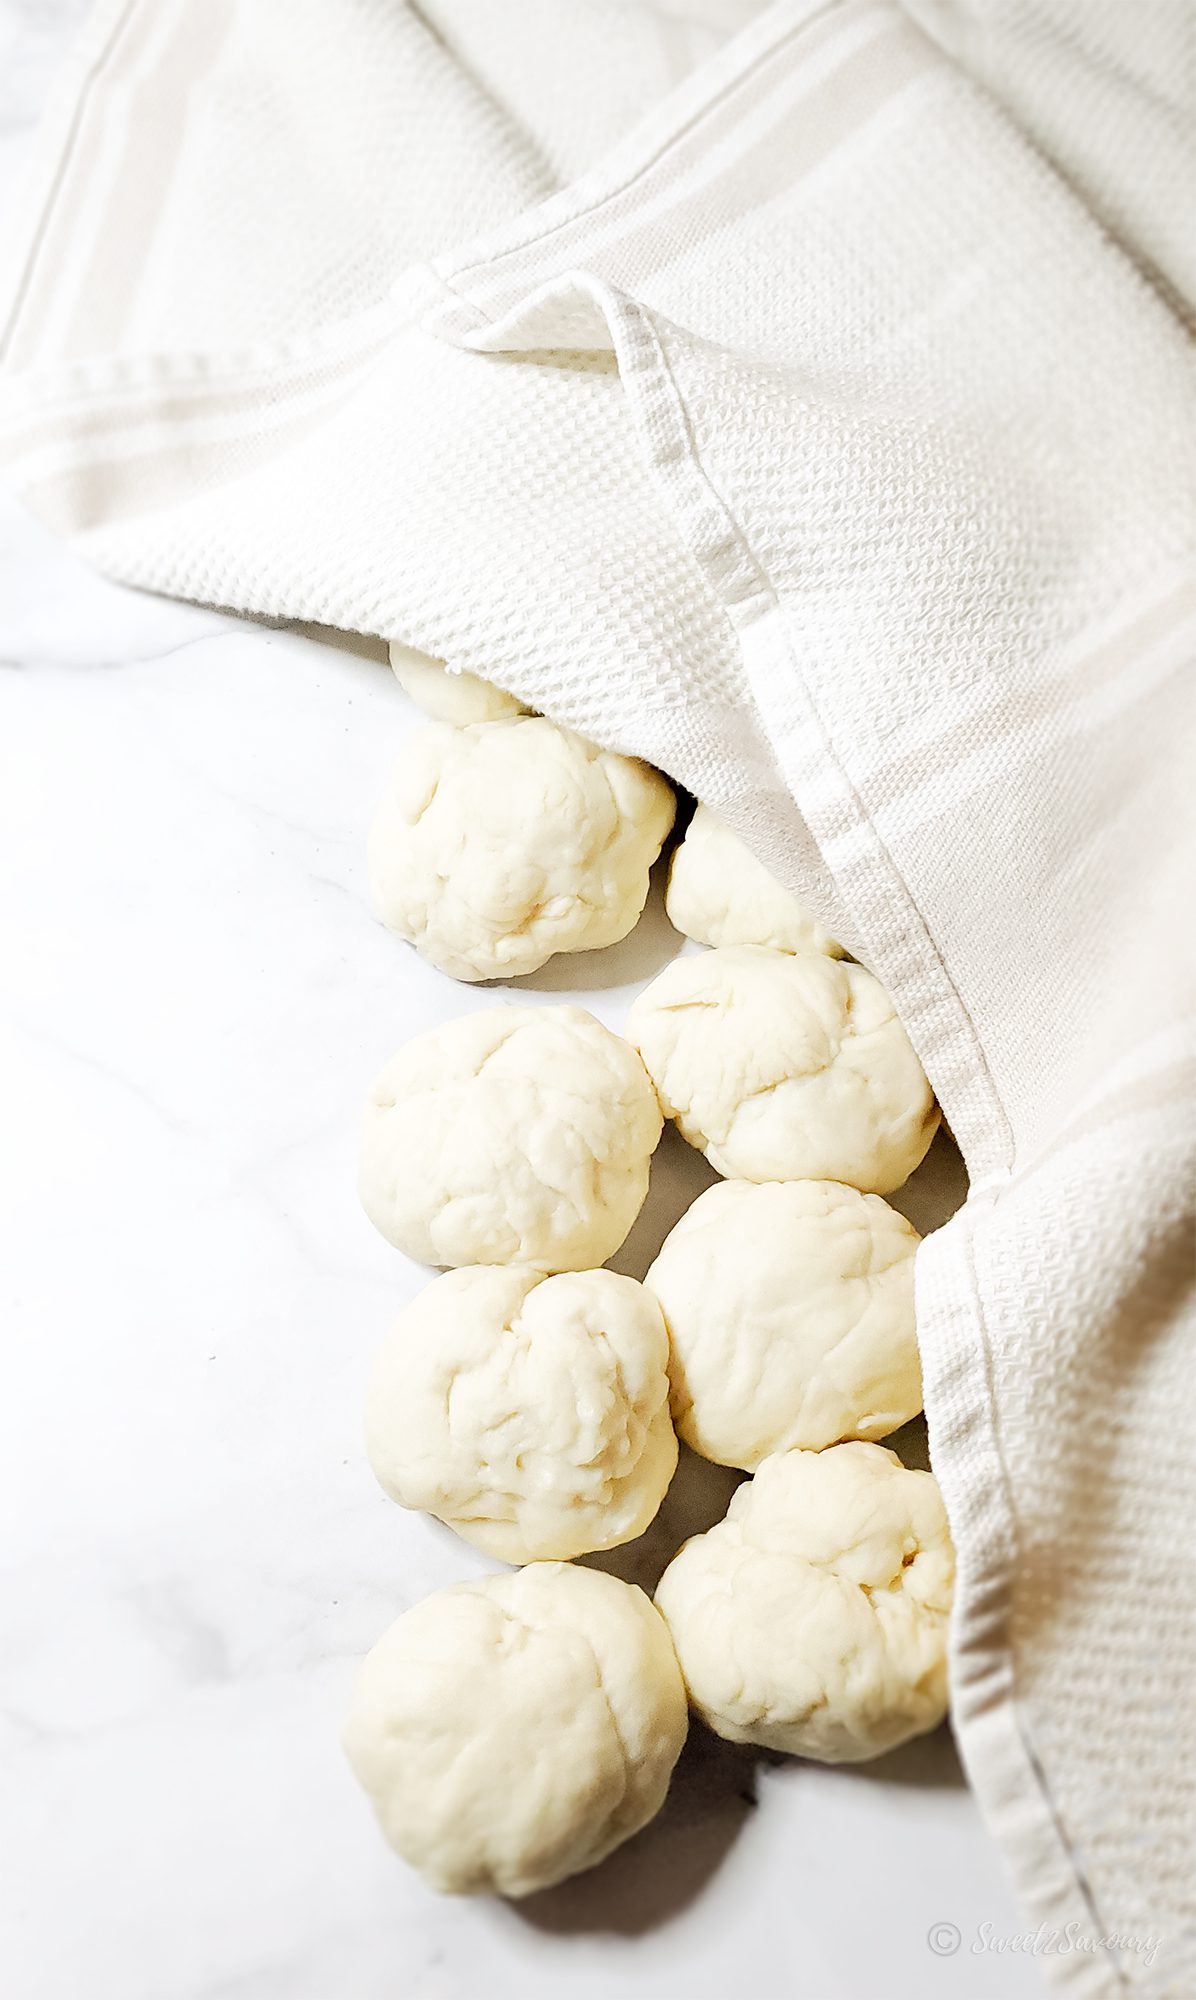
- Shape dough into a ball. Place into a greased bowl or add 1 tablespoon vegetable oil to mixer bowl and roll dough ball around to coat oil evenly. Cover bowl with plastic wrap loosely and place a clean tea towel on top. Place bowl in oven with "bread proof" heat still on. If oven is set to 170°F manually, turn oven off and leave door closed until proof time is done (no peeking!). Set timer for 1h.
Buns
- After 1 hour of proofing, leave 'bread proof' heat on or manually turn oven back on to 170°F (76.7°C). Gently punch down dough with fingers to release gas bubbles formed by yeast. Use a food scale to weigh total weight of dough in grams (mine was 1187 g). Divide this total weight by 20 and write down the result (59 g). This is the weight of each dough ball needed for 20 buns.
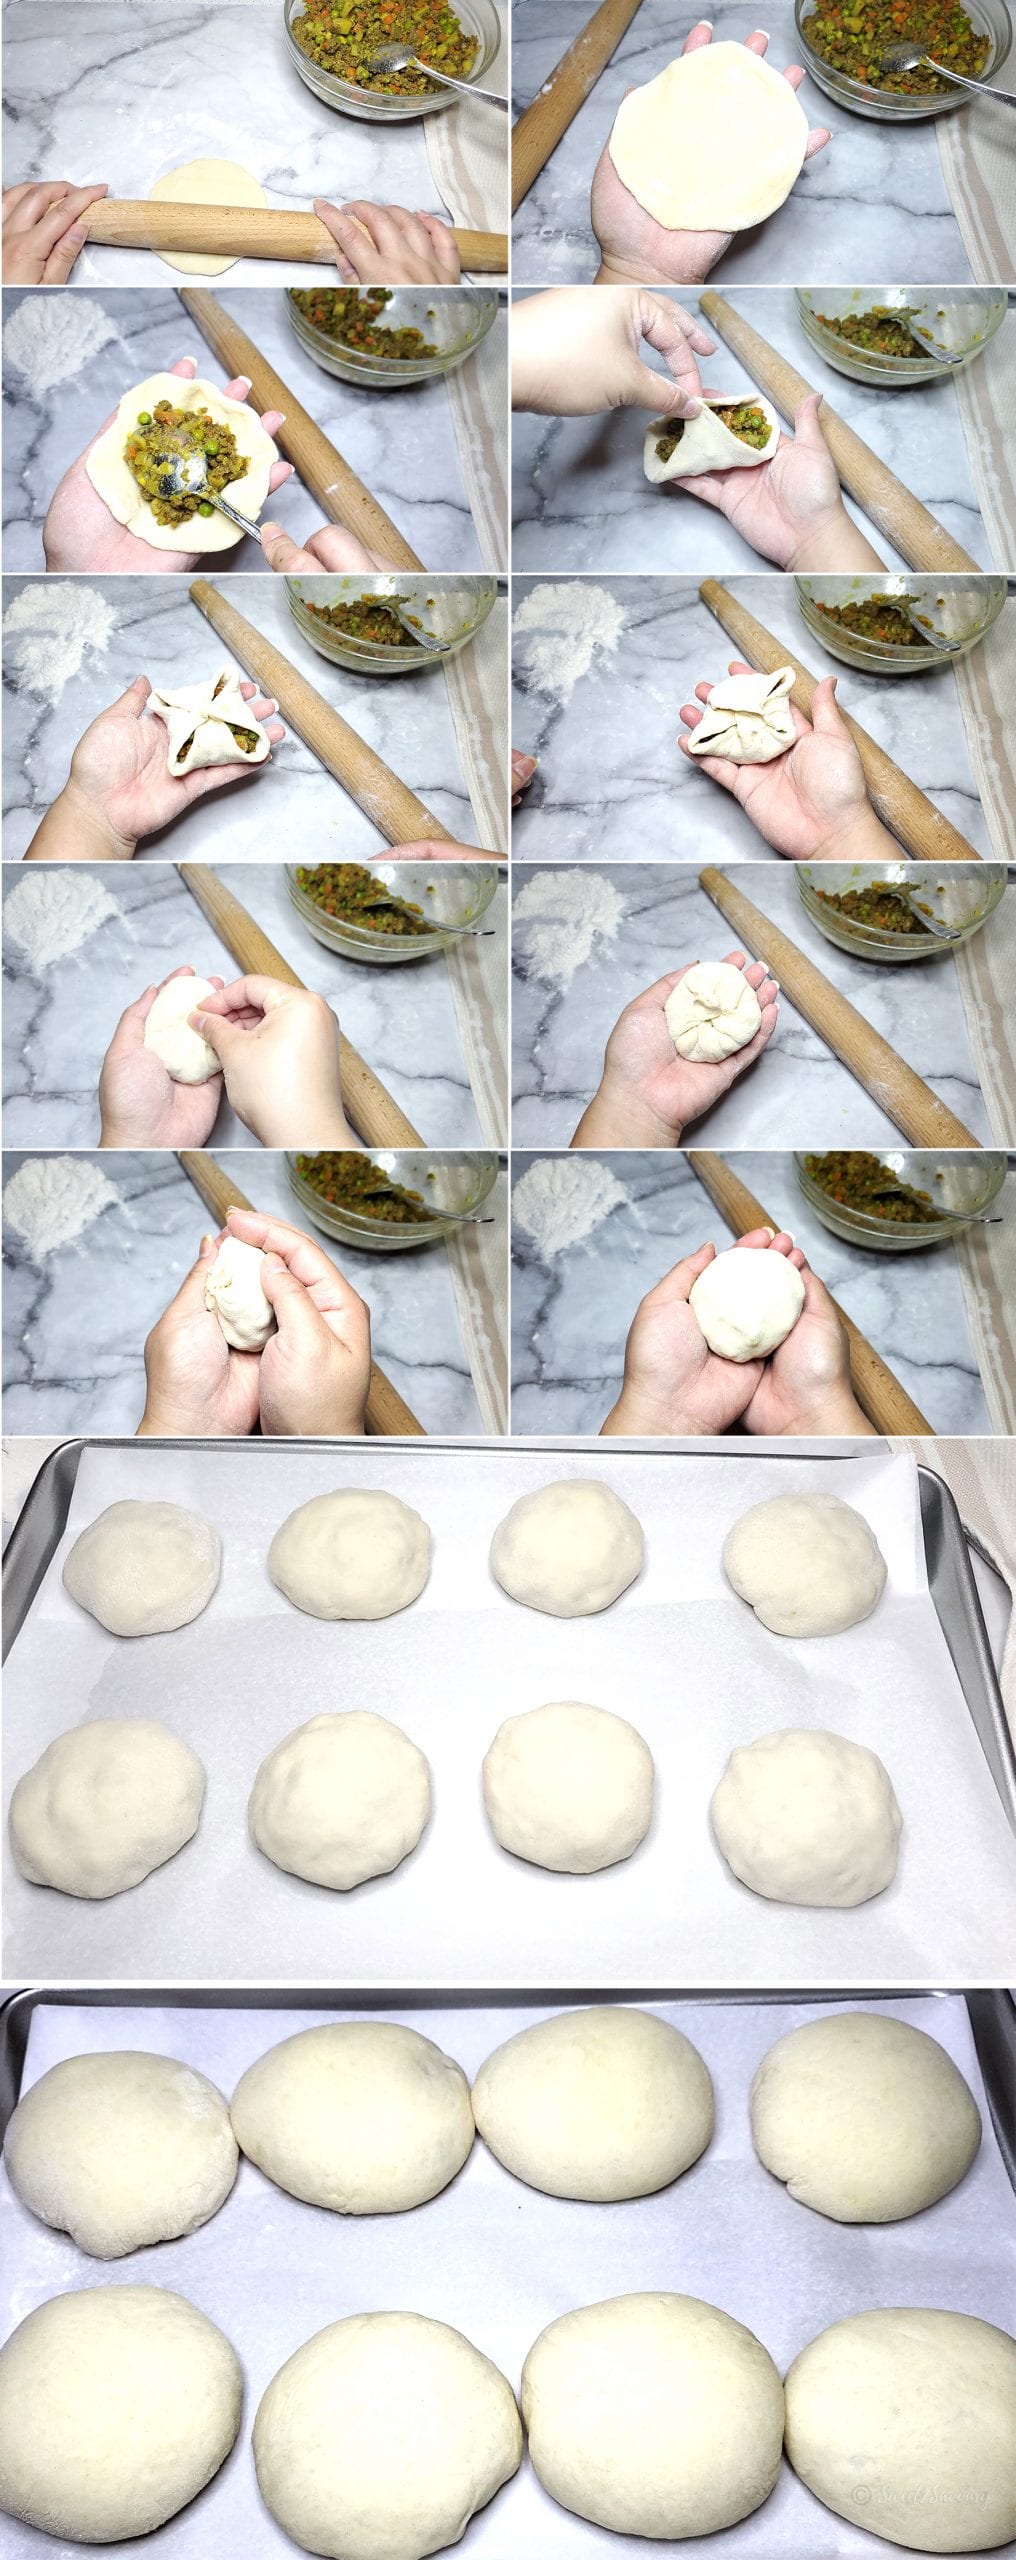
- Dust flour on a clean work surface, knead dough for 1 minute and roll into a long, even log. Use a sharp knife or pastry scraper to divide log into 20 equal pieces. Weigh each dough piece and add or subtract dough to ensure total weight equals weight we just calculated in step 1 for each ball (59 g). Knead and shape into a ball. Cover with a clean, dry cloth (to prevent dough from drying).
- Line 2 baking trays with parchment paper. Dust rolling pin with flour (and work surface if more is needed), roll out dough ball into a medium disc about 5 inch in diameter and 1 centimeter in thickness. Place disc into the palm of your hand, add 2 to 3 tablespoons of meat filling to center of dough, lift dough around the edges, pinch together and slightly twist to seal. Place bun with sealed side down on tray. Cover with dish cloth while you continue to work.Repeat this step until all dough balls are shaped and filled into buns. Place each bun 2 inches apart on tray. Cover trays with dish cloth and place into oven for a second rise for 30 minutes with bread proof feature on or 170°F warmed oven.
- Remove trays from oven when 2nd proofing is done. Preheat oven to 350°F (176°C). Combine 1 large beaten egg and 1 tablespoon water together. Gently, brush egg wash with pastry brush over each bun. Bake buns for 20 minutes or until golden brown. Allow to cool on a wire rack for 10 minutes. Enjoy!


Tips
What is Milk Bread? With a name like Milk bread, it’s obvious that milk is the dominant ingredient in this recipe. The fat derived from milk replaces the need to incorporate butter (although I have seen recipes that include both butter and milk). Some prefer to use heavy cream and milk, others only use milk. The end result is a rich and pillowy bread texture that has a softer crust with a slight chew. It’s delicious on its own but also versatile for sweet and savoury fillings. This type of bread keeps a little longer and even contributes more nutrients thanks to the addition of milk and instant milk powder. It’s different from other types of bread due to the use of milk rather than water, however, the process of making and proofing dough is the same. Why use room temperature dairy ingredients? It makes a big difference using dairy at room vs. cold temperature. When mixing ingredients at room temperature the batter or dough will mix/blend together better for a smoother batter or pliable dough without clumping. Plan ahead and leave ingredients on your counter overnight or at least 1 hour ahead. Do I need to sift my flour? It’s not mandatory but recommended. Commercial flour is refined enough that you won’t need to do this. I don’t always sift flour depending on the recipe. However, it does help break up any lumps, filter ‘dirt’ (like leftover husks or seeds that may not have been refined) and aerates the flour to help with mixing the rest of the ingredients Instant yeast vs. Active dry yeast What’s the difference? Instant yeast (aka. rapid rise or quick rise) does not need to be dissolved in water and can be mixed right into your dry ingredients (usually smaller in granules too). Active dry yeast does need to be dissolved in water first (with added sugar to help ‘feed’ the living organism to activate the yeast) How should I store left over buns? Store left over buns in an airtight container or resealable bag in the refrigerator up to 4 days or 6 weeks in the freezer in plastic zipppered bags. To reheat refrigerated buns, heat in microwave for 1-2 minutes (microwave cook times vary, reheat 1 minute at a time). If reheating from frozen, place frozen buns into a steamer and steam for approx. 5 to 7 minutes until soft and hot or reheat in the microwave for 3 minutes (or additional minutes if required).
Nutrition Facts
Soft Curry Beef Buns
Serving Size
1 bun
Amount per Serving
Calories
293
% Daily Value*
Fat
6
g
9
%
Saturated Fat
3
g
19
%
Trans Fat
1
g
Cholesterol
49
mg
16
%
Sodium
588
mg
26
%
Potassium
531
mg
15
%
Carbohydrates
42
g
14
%
Fiber
4
g
17
%
Sugar
9
g
10
%
Protein
18
g
36
%
Vitamin A
2339
IU
47
%
Vitamin C
16
mg
19
%
Calcium
70
mg
7
%
Iron
2
mg
11
%
* Percent Daily Values are based on a 2000 calorie diet.
Did you make this? I would love to see your creation!Tag me @sweet2savoury on Instagram and hashtag it #sweet2savoury
If you enjoyed my recipe, please leave a comment or rate it below. Also don’t forget to follow me on my social media channels (YouTube, Pinterest, Facebook, Instagram) to keep up with my latest kitchen shenanigans.