This post may contain affiliate links, which means I’ll receive a commission if you purchase through my links, at no extra cost to you. This helps keep the content on my site free. please read my disclosure here
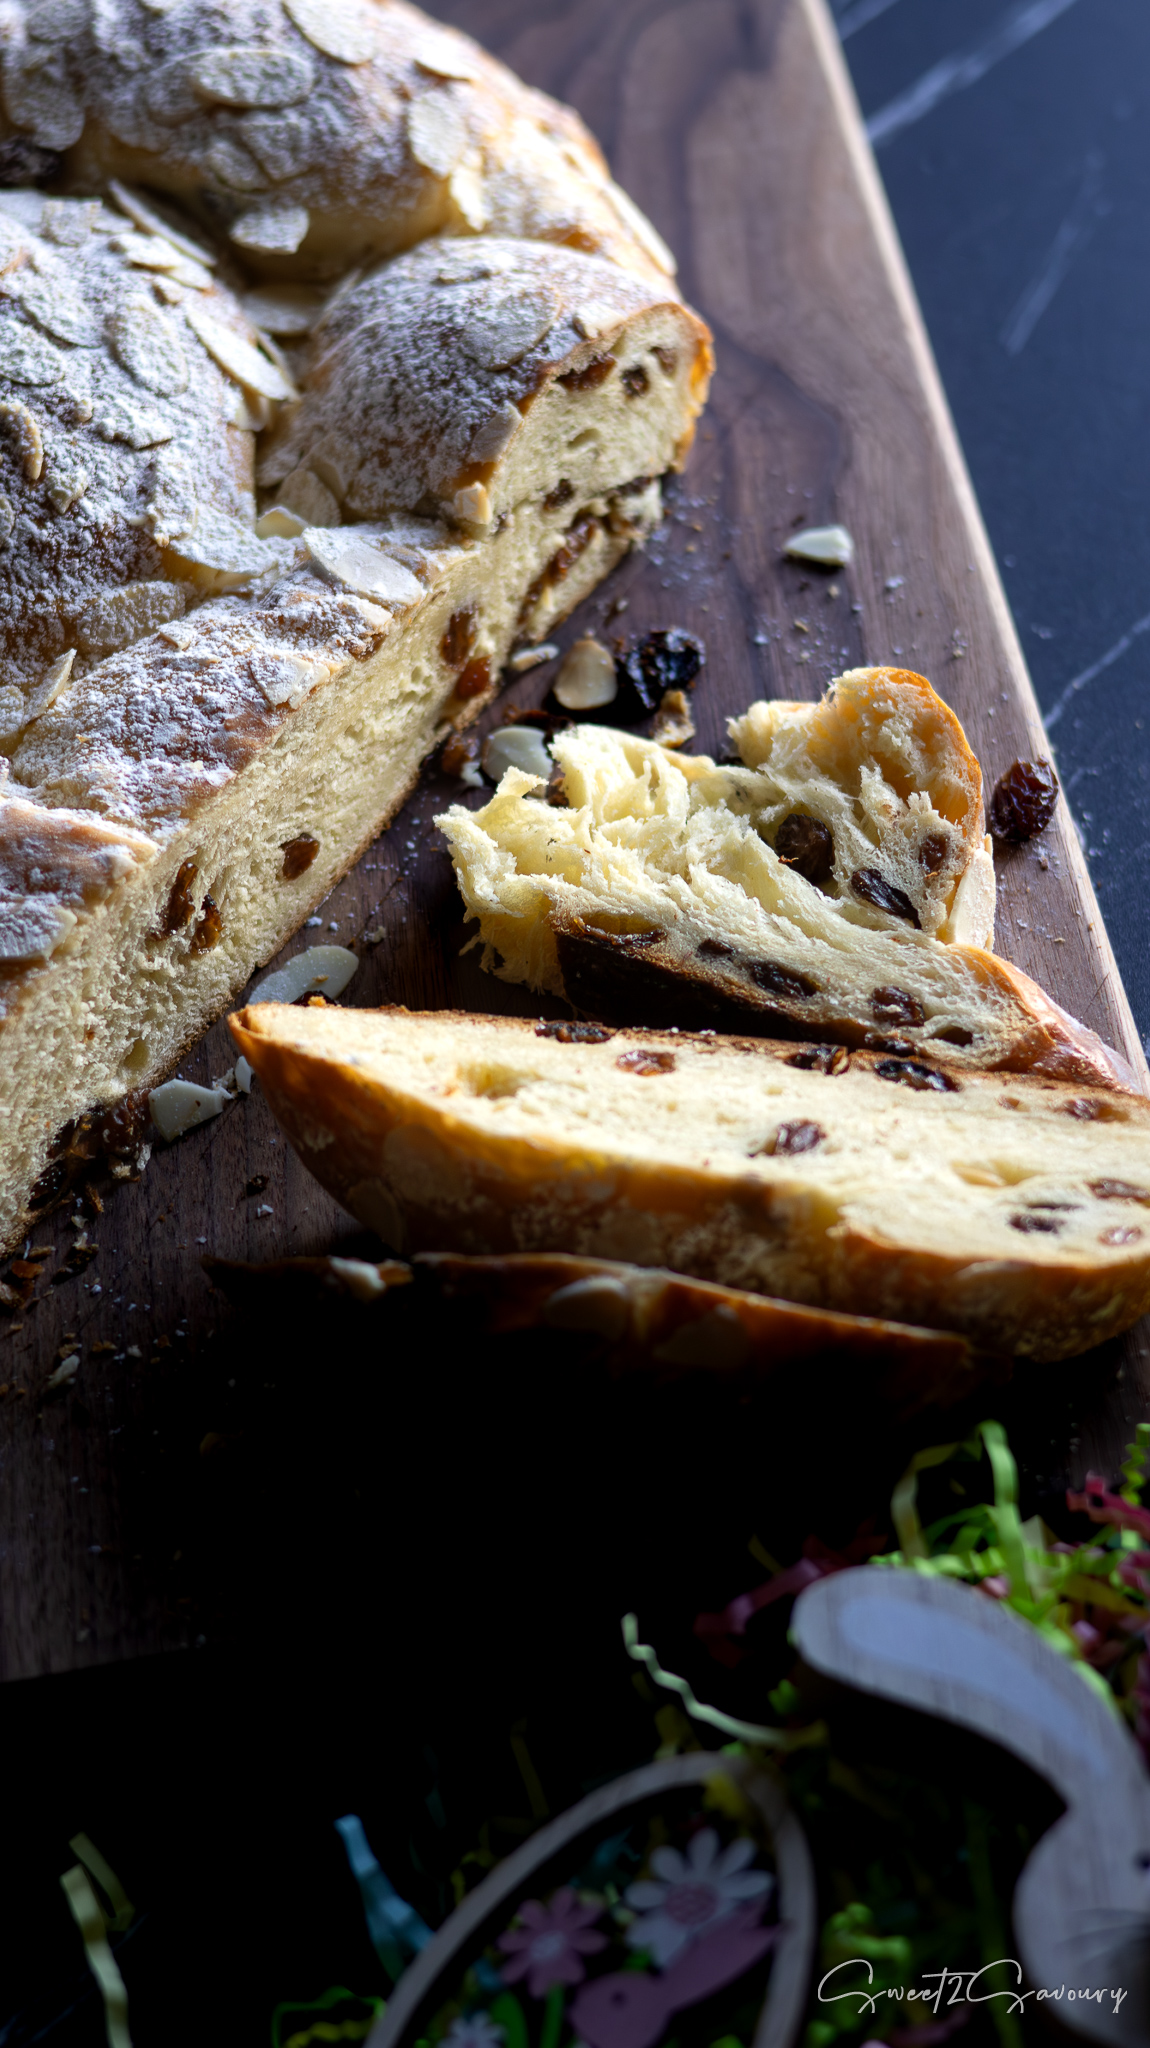
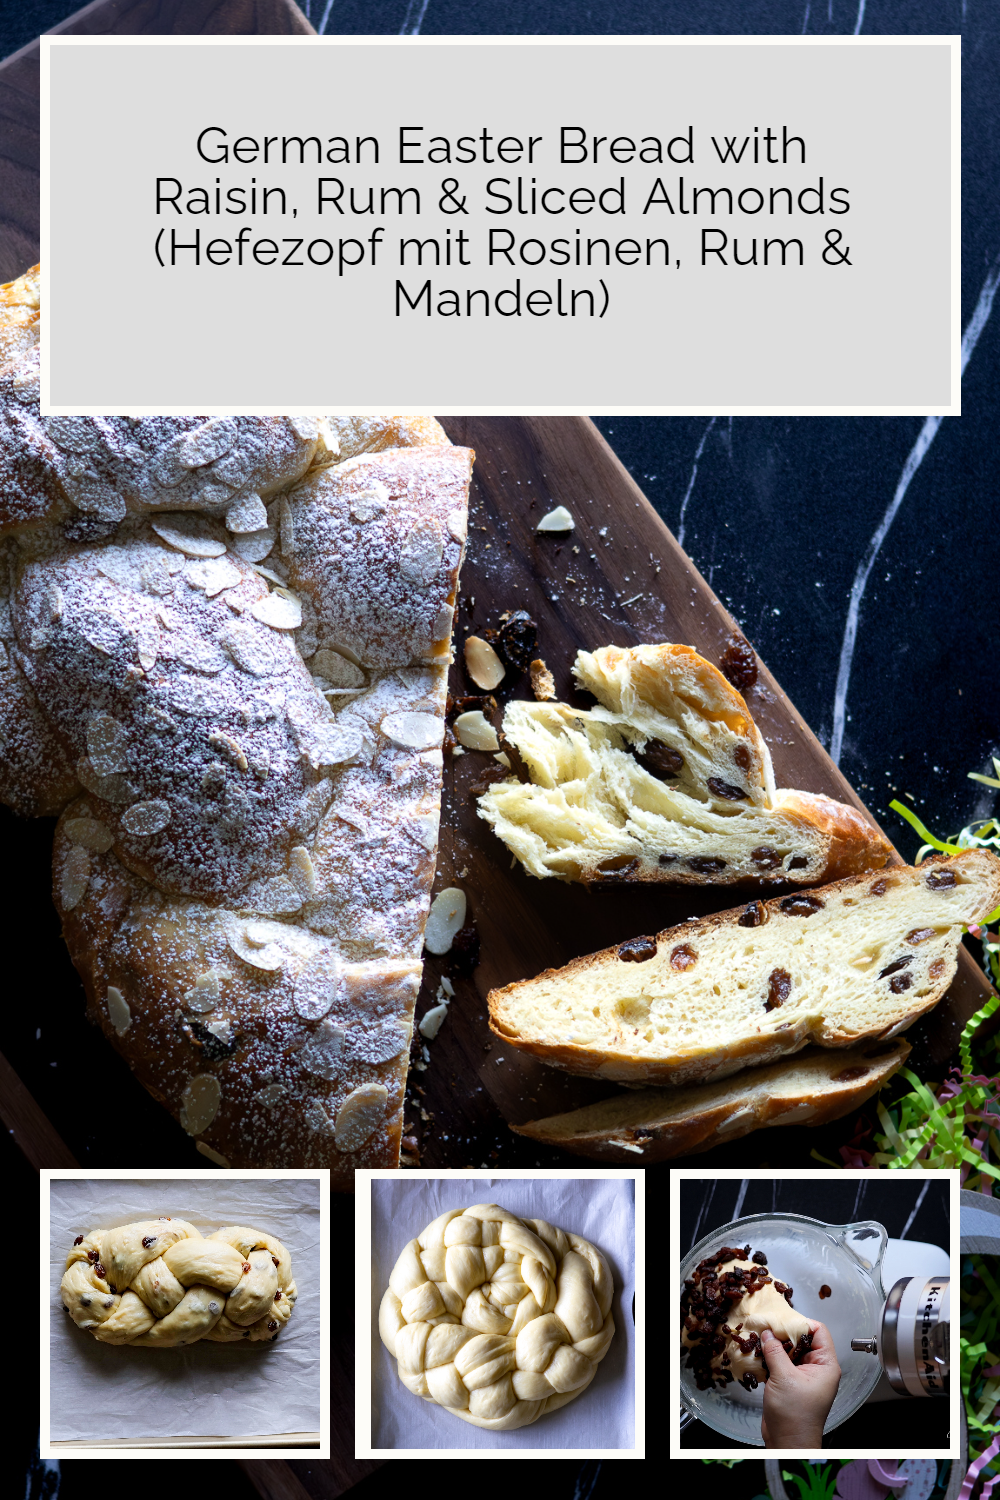
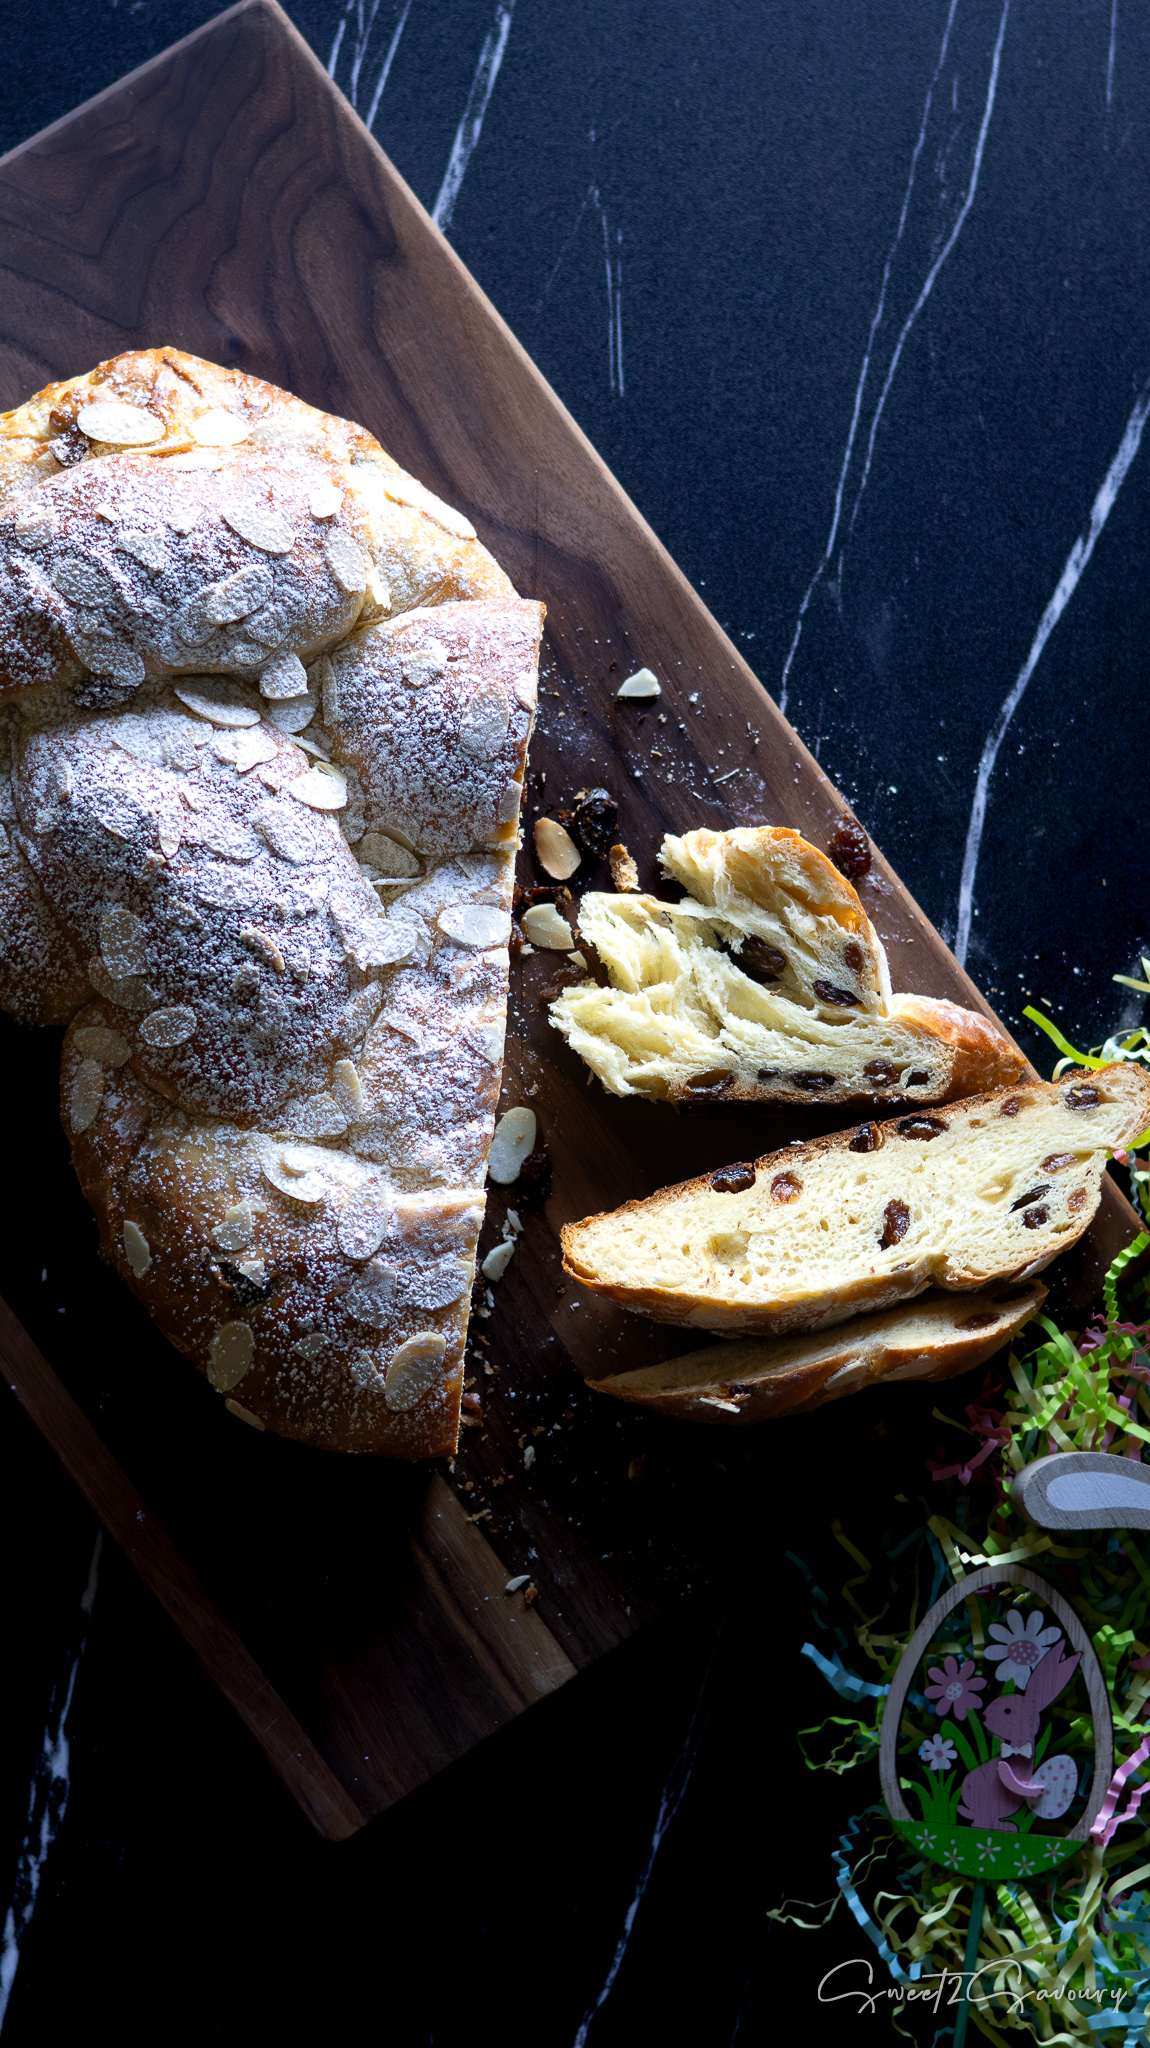
Fluffy, golden, and lightly sweet — this traditional German easter bread is the ultimate brunch centrepiece!
There’s something truly special about a homemade yeast braid. This recipe for Hefezopf is generously filled with raisins, topped with sliced almonds, and enhanced with a good amount of rum. Every bite evokes warmth and tradition around the dinner table.
What is Hefezopf?
Hefezopf (pronounced HEY-feh-tsawpf) translates to “yeast braid” in German. It is a soft, enriched bread similar to brioche or challah bread, traditionally served during Easter in Germany and other parts of Europe. This bread is lightly sweetened and enriched with butter and eggs, often filled with raisins or flavoured with ingredients like vanilla, lemon zest, or rum. Some people prefer it plain. The braided shape symbolizes unity and celebration, making it ideal for festive occasions like Easter.
What type of raisins can I use? There are several types of raisins you can buy, specifically Sultanas, Raisins, and Currants. The main differences among them are the type of grape used and the drying process. Any of these options can be used for this recipe. I chose Sultanas since that is what I had on hand. Just make sure that your raisins are fresh and not too hard in texture.
Can I soak raisins in the rum first? If you love a bolder rum raisin flavour, feel free to soak the raisins first! And don’t worry about wasting that delicious rum—just add it to the dough afterward for an extra boost of flavour!
What type of Rum should I use? I prefer dark rum for its bolder flavour, but you can use any rum you like. Keep in mind that the sugar content in rum can affect your baked loaf; the sweeter the rum, the quicker it will brown during baking. If you don’t like the taste of alcohol, you can substitute it with rum extract instead.
Why do you add butter as the last ingredient after the dough is kneaded? It’s a technique I learned while making brioche that involves adding butter to the dough during the initial kneading, rather than at the beginning when you combine the other ingredients. This method has several benefits: it enhances the dough’s texture and flavour, making it softer and more tender. Additionally, it makes the dough more manageable and can potentially result in a flakier texture.
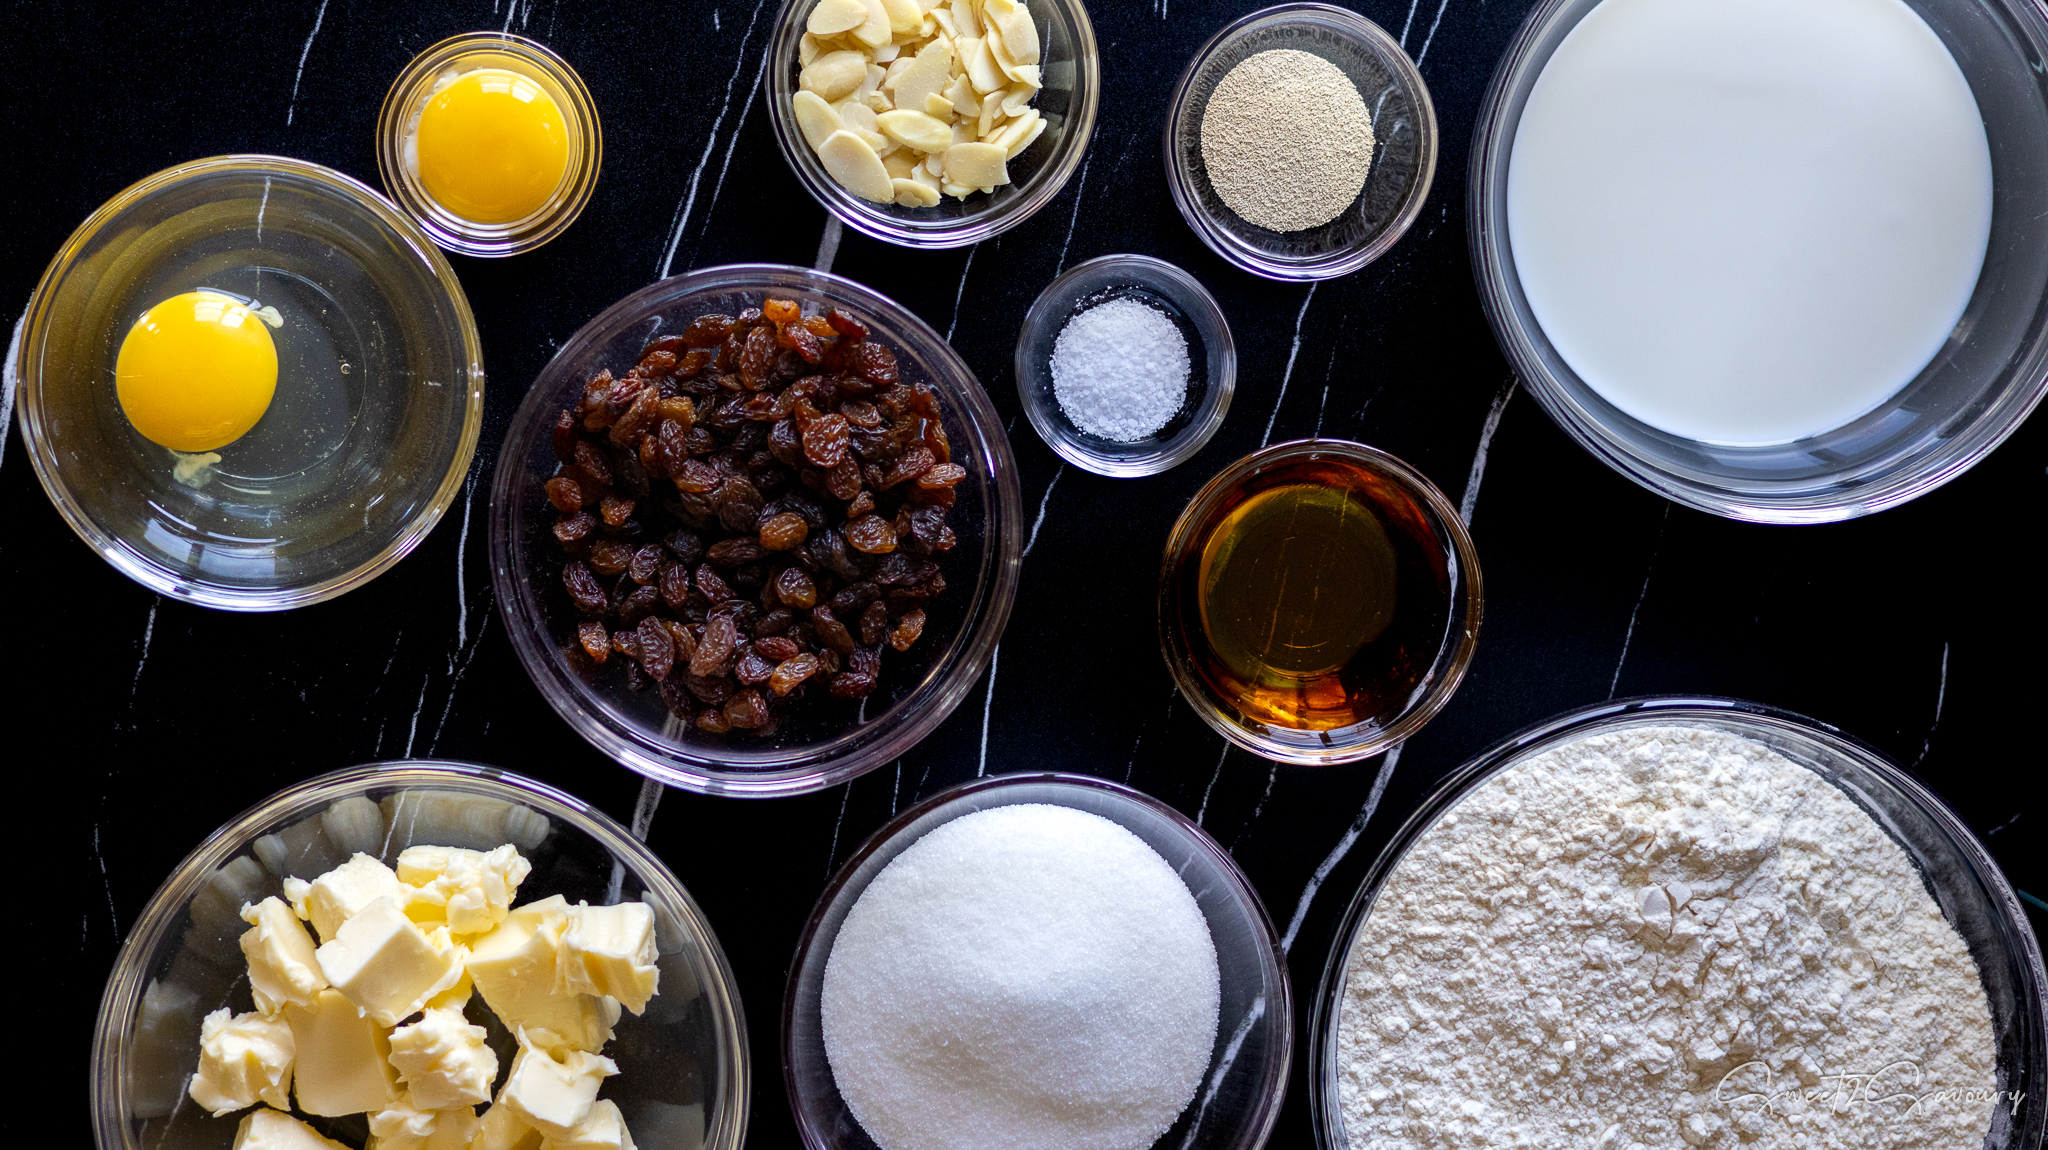
Ingredients you will need:
Bread Flour – for a soft, structured crumb
Salt – to balance the sweet level
Milk – when warmed correctly, a perfect yeast environment
Instant yeast – easy and fast-rising
White sugar – feeds the yeast and adds sweetness
Egg + egg yolk – enriches the dough (save the egg white for brushing! #nowaste)
Dark rum – optional, but adds flavour depth (substitute with vanilla or orange zest if desired)
Unsalted butter – cubed and softened, added gradually for richness
Raisins – adds more natural sweetness
Sliced almonds – crunchy, toasty topping
Why You'll Love this for Easter
Make-ahead friendly: Complete all the steps until you’ve braided it, cover and refrigerate it overnight. The next day let it sit covered on the counter to warm to room temperature & rise for 1 – 2 hours, before baking.
Customizable: Not a raisin fan? Swap in dried cranberries, chopped apricots, or simply keep it plain.
Upgraded bread: That golden braid with toasted almonds is basically edible decor and an upgrade to your standard bread.
In North America, we store our milk in the refrigerator, unlike in Europe, which means it is usually cold. Before you start, you can measure the milk and let it sit on the counter to reach room temperature. For a quicker option, you can heat the milk in a heatproof bowl in the microwave for about 1.5 minutes. Keep in mind that this time may vary depending on your microwave’s power rating, which typically ranges from 800 to 1000 watts. When finished, the milk should be heated to a temperature between 140°F and 145°F.
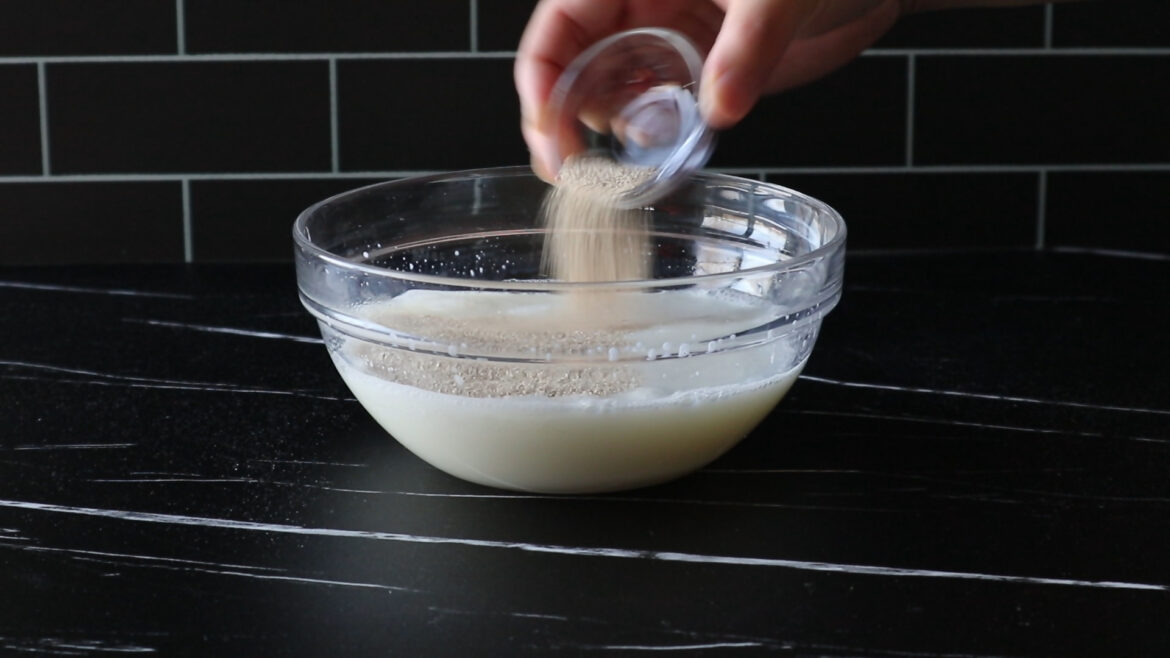
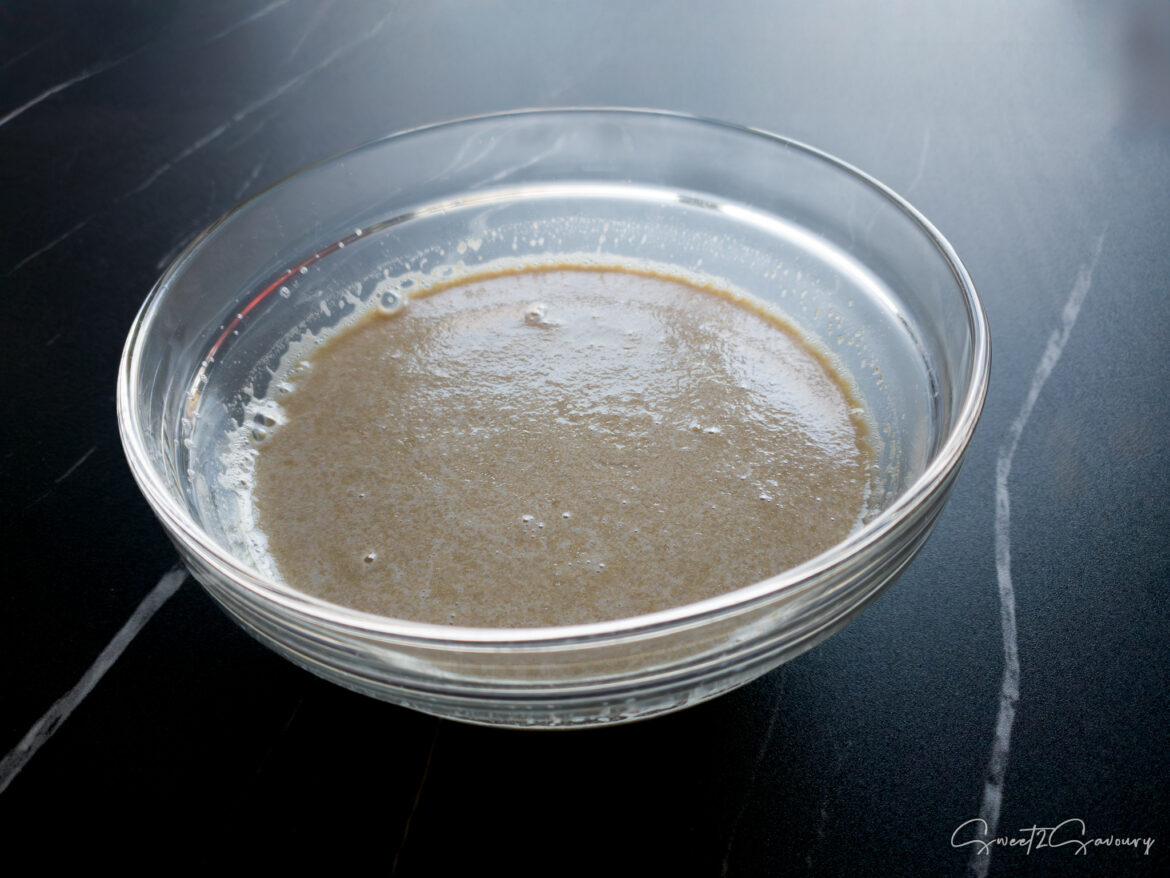
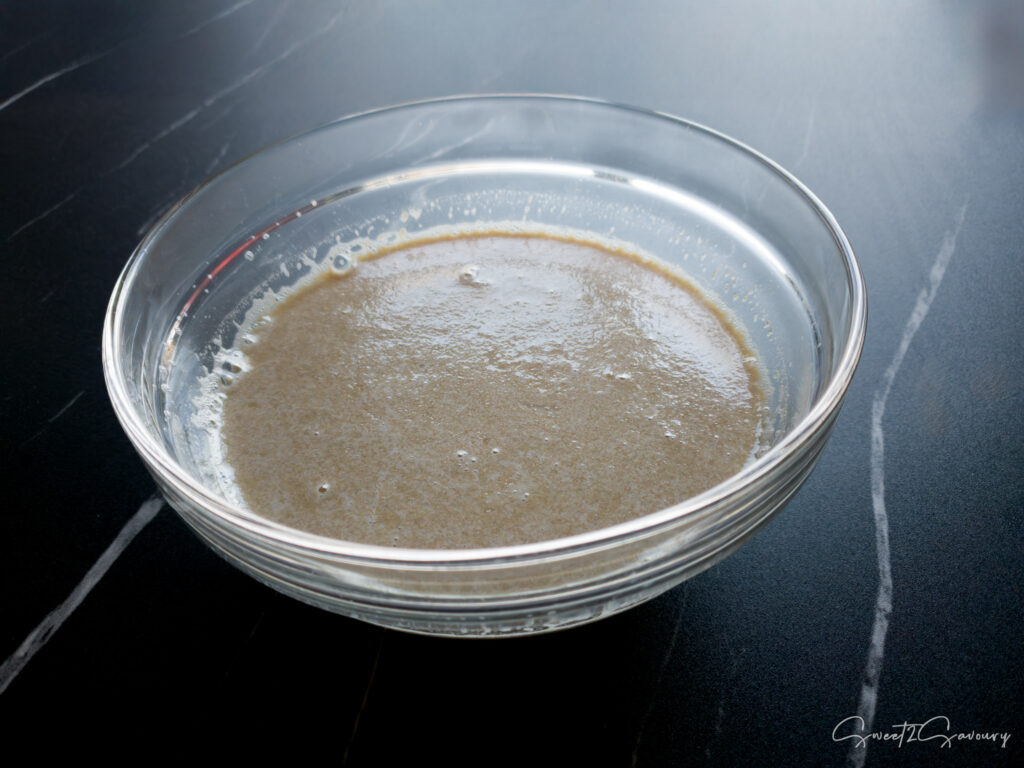
Next, add white sugar and stir until it dissolves. This will lower the milk temperature to about 120°F to 130°F (if not, wait for the milk to cool to this range). It is the ideal temperature for your yeast to thrive. If the temperature is too high, it could kill the yeast. Stir in the instant yeast and let this mixture sit for 5 minutes. Activating the yeast in this way is also a good test to ensure it is still active, saving you from the disappointment of a dough that doesn’t rise after all your hard work. Although instant yeast can be added directly to the flour, I prefer to activate it first to ensure the best results with my dough.
Tip
For more information on how to quickly bring ingredients to room temperature, you can read my post about it here.
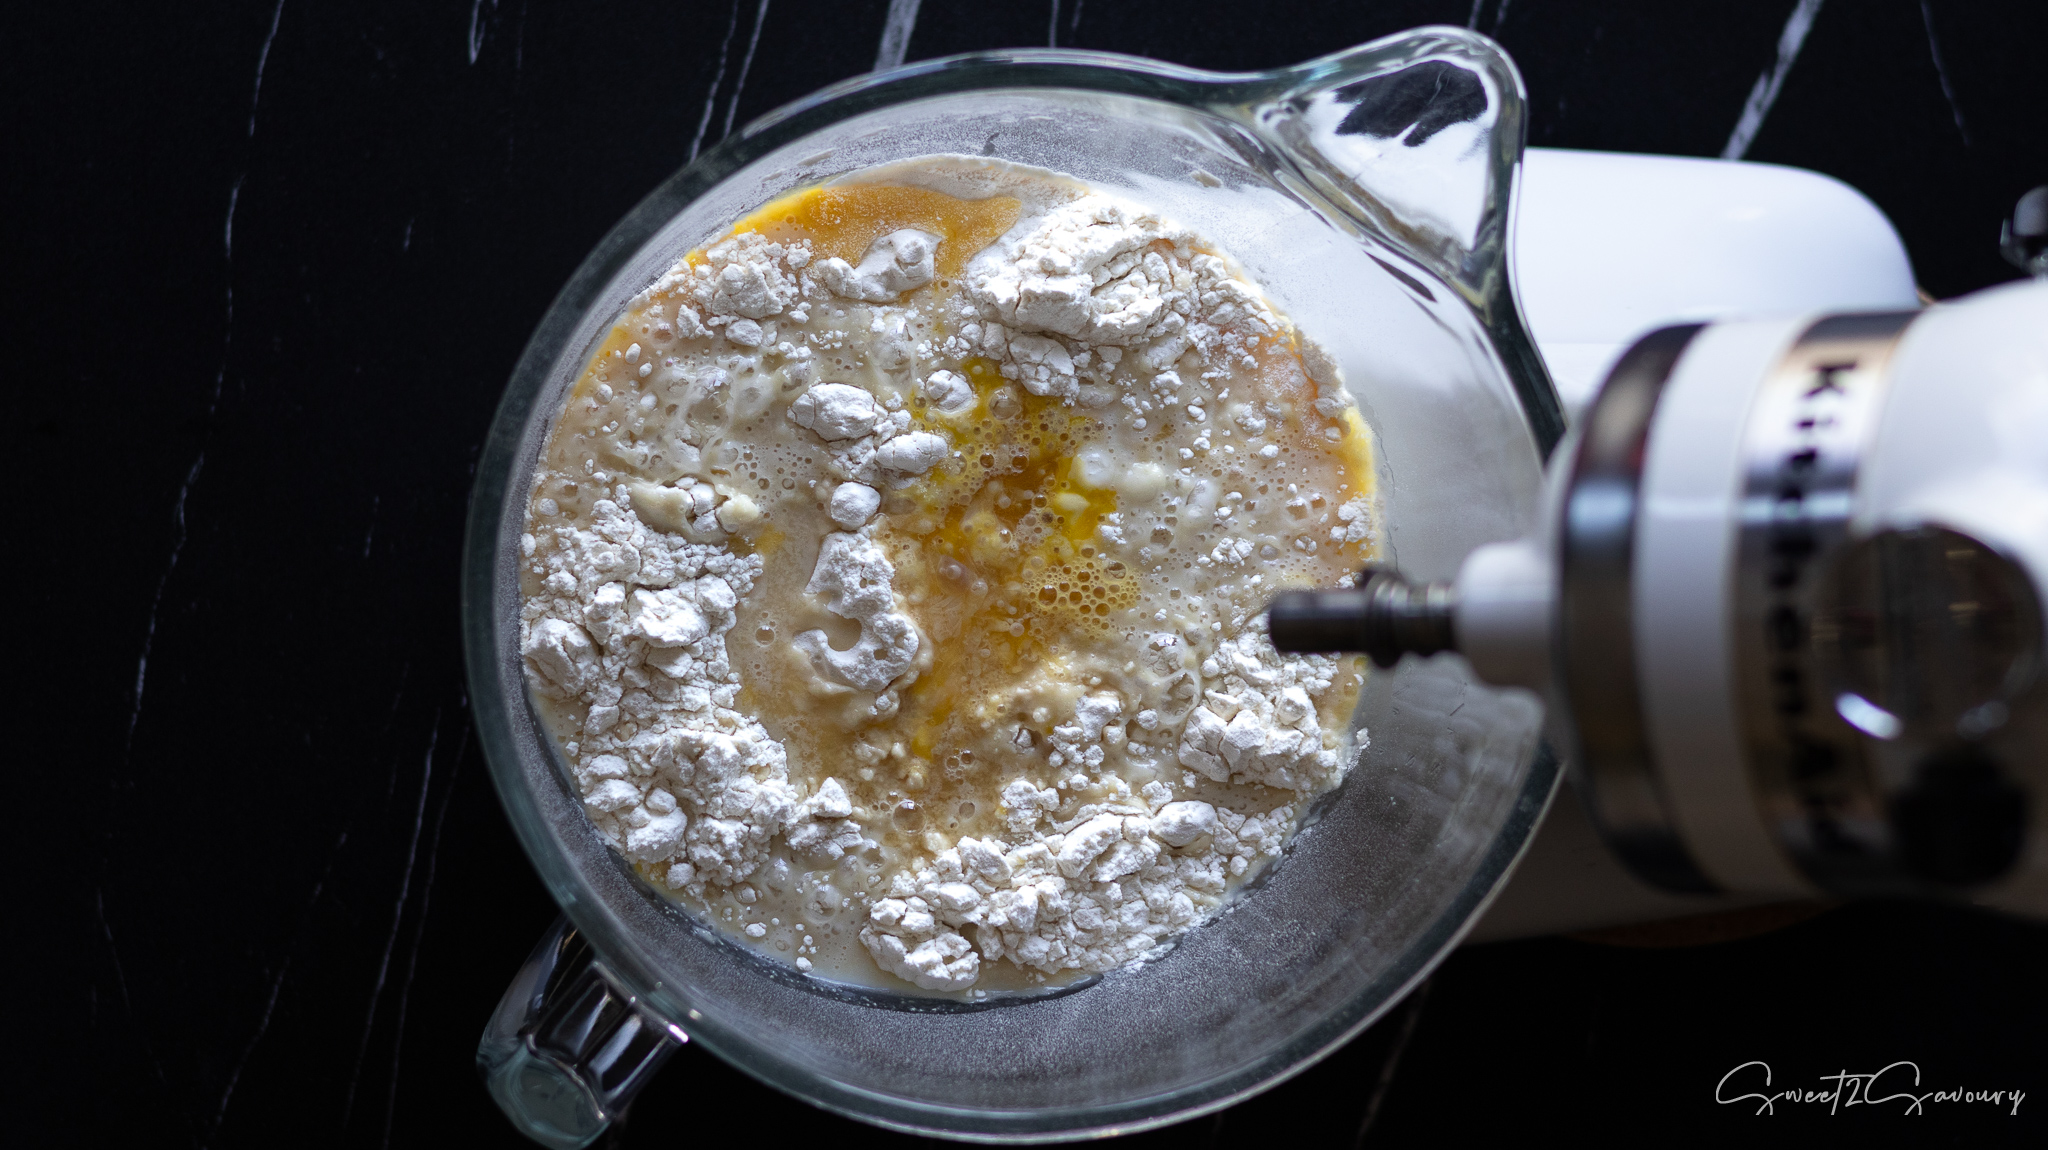
In the bowl of your mixer, combine the bread flour and salt, and whisk them together to break up any lumps. If you prefer, you can sift the flour instead. Next, add the sweet milk mixed with yeast, whole egg, egg yolk, and dark rum.
Using a dough hook, mix the ingredients on low speed until they come together to form a rough dough ball. Increase the mixer speed to medium and mix the dough for an additional 2 minutes.
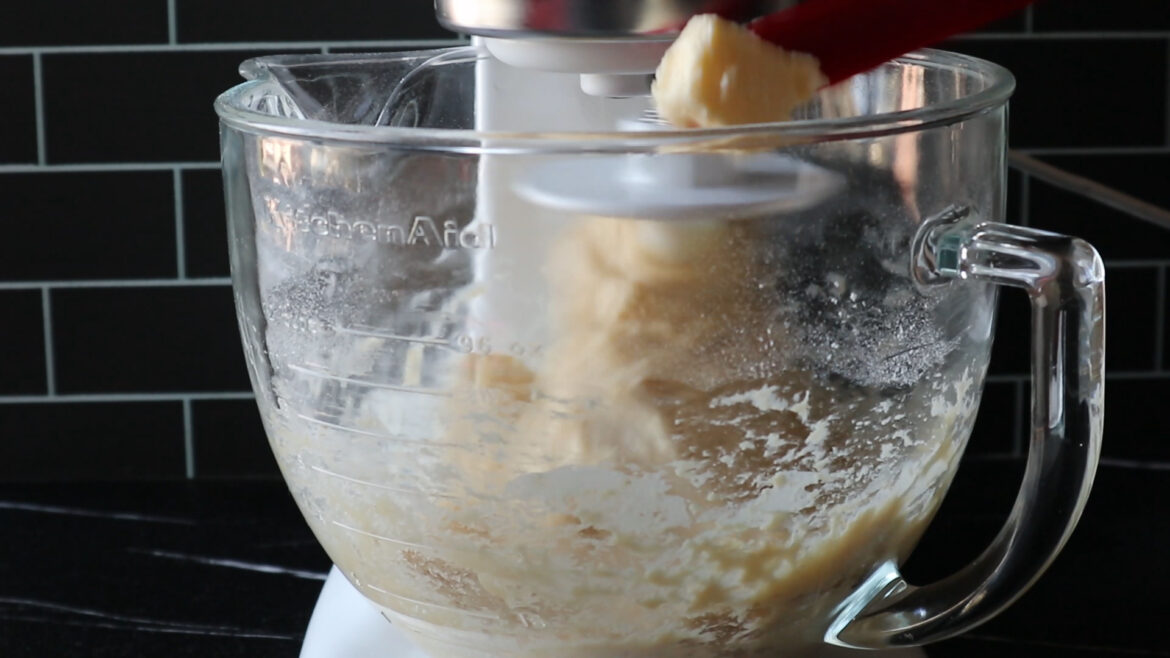
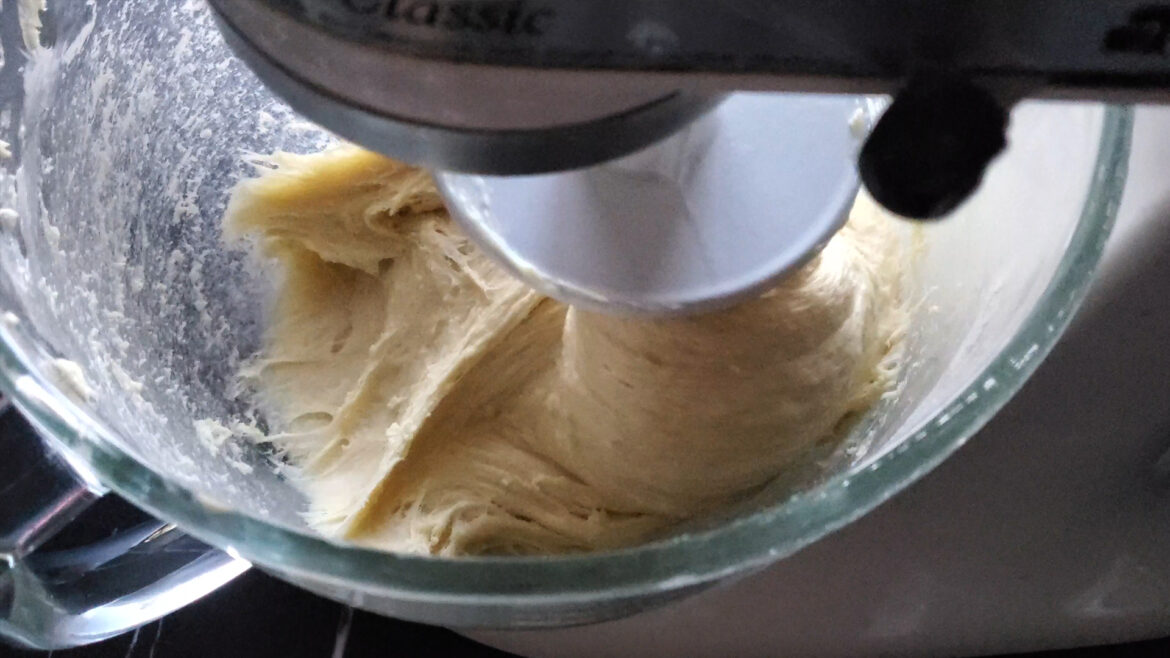
Then, add the softened butter one cube at a time, waiting until each cube is fully incorporated before adding the next one. Adding the butter at this stage enhances the texture and flavour of the dough, making it softer and more tender. This method also helps make the dough more manageable and may result in a flakier texture.
Although the dough will appear very sticky at first, continue kneading it on medium speed until it becomes a smooth, elastic consistency. This process typically takes about 5 to 7 minutes. The dough should be stretchy when lifted but should not stick to your hands.
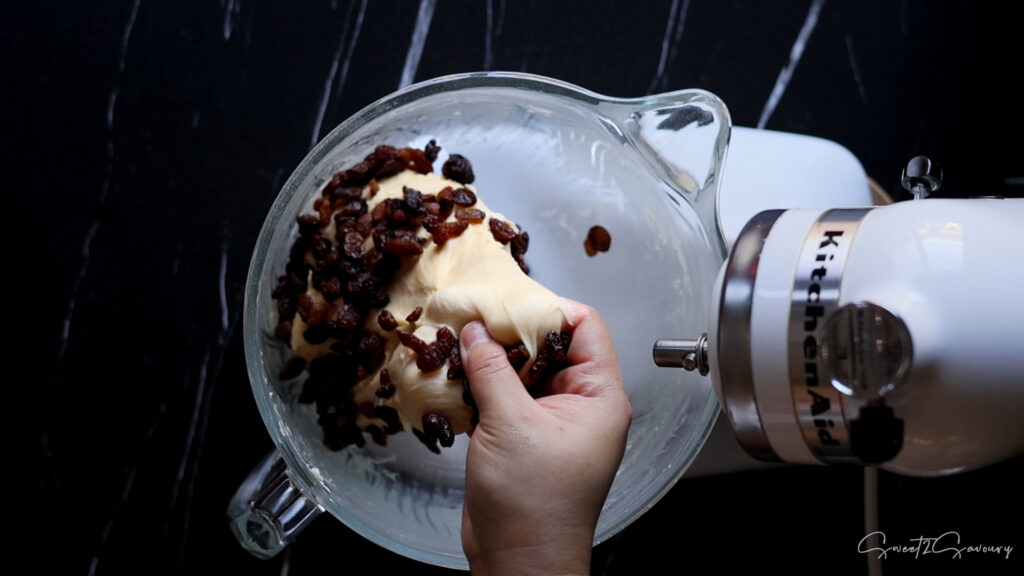
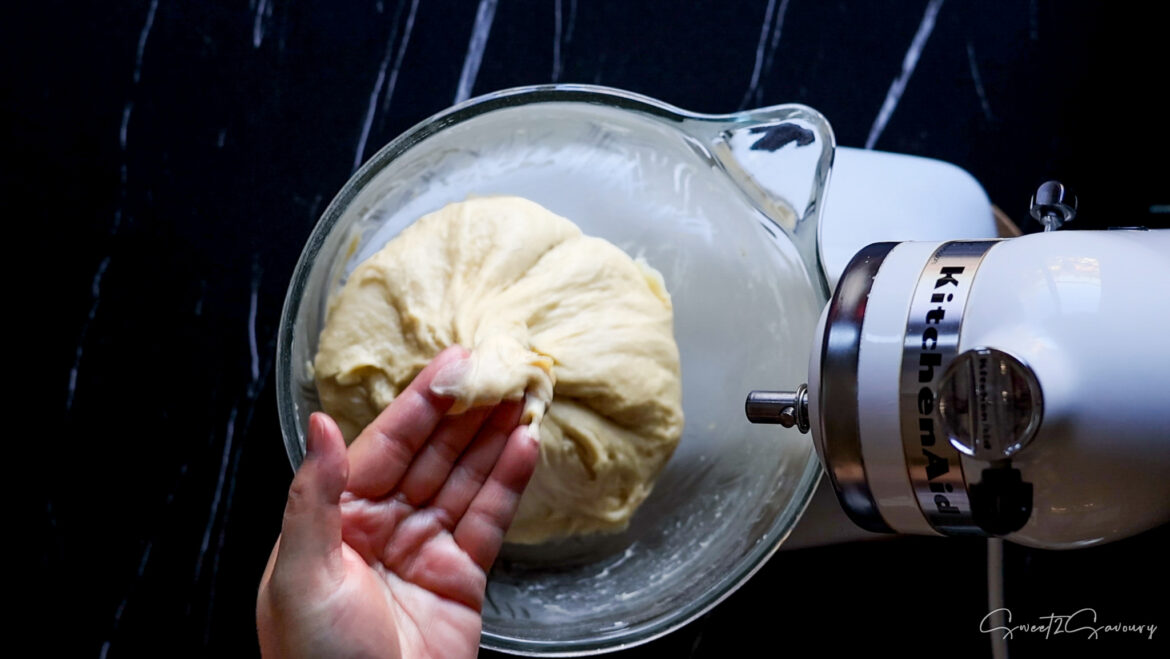
Once your dough is smooth and elastic, gently knead the raisins in by hand. This technique helps to keep the raisins whole, unlike using a stand mixer, which can crush them and cause their filling to bleed into the dough.
Cover the bowl with plastic wrap and a clean hand towel, then allow the dough to rise until it has doubled in size. If you live in a cooler climate, as mentioned in my previous post for my sourdough fermentation, you can place the dough in the oven with the oven light on to provide gentle warmth for the rising process. If you live in a warm climate, letting it rise on your counter is also a good option.
Step 4 - Shape and Braid
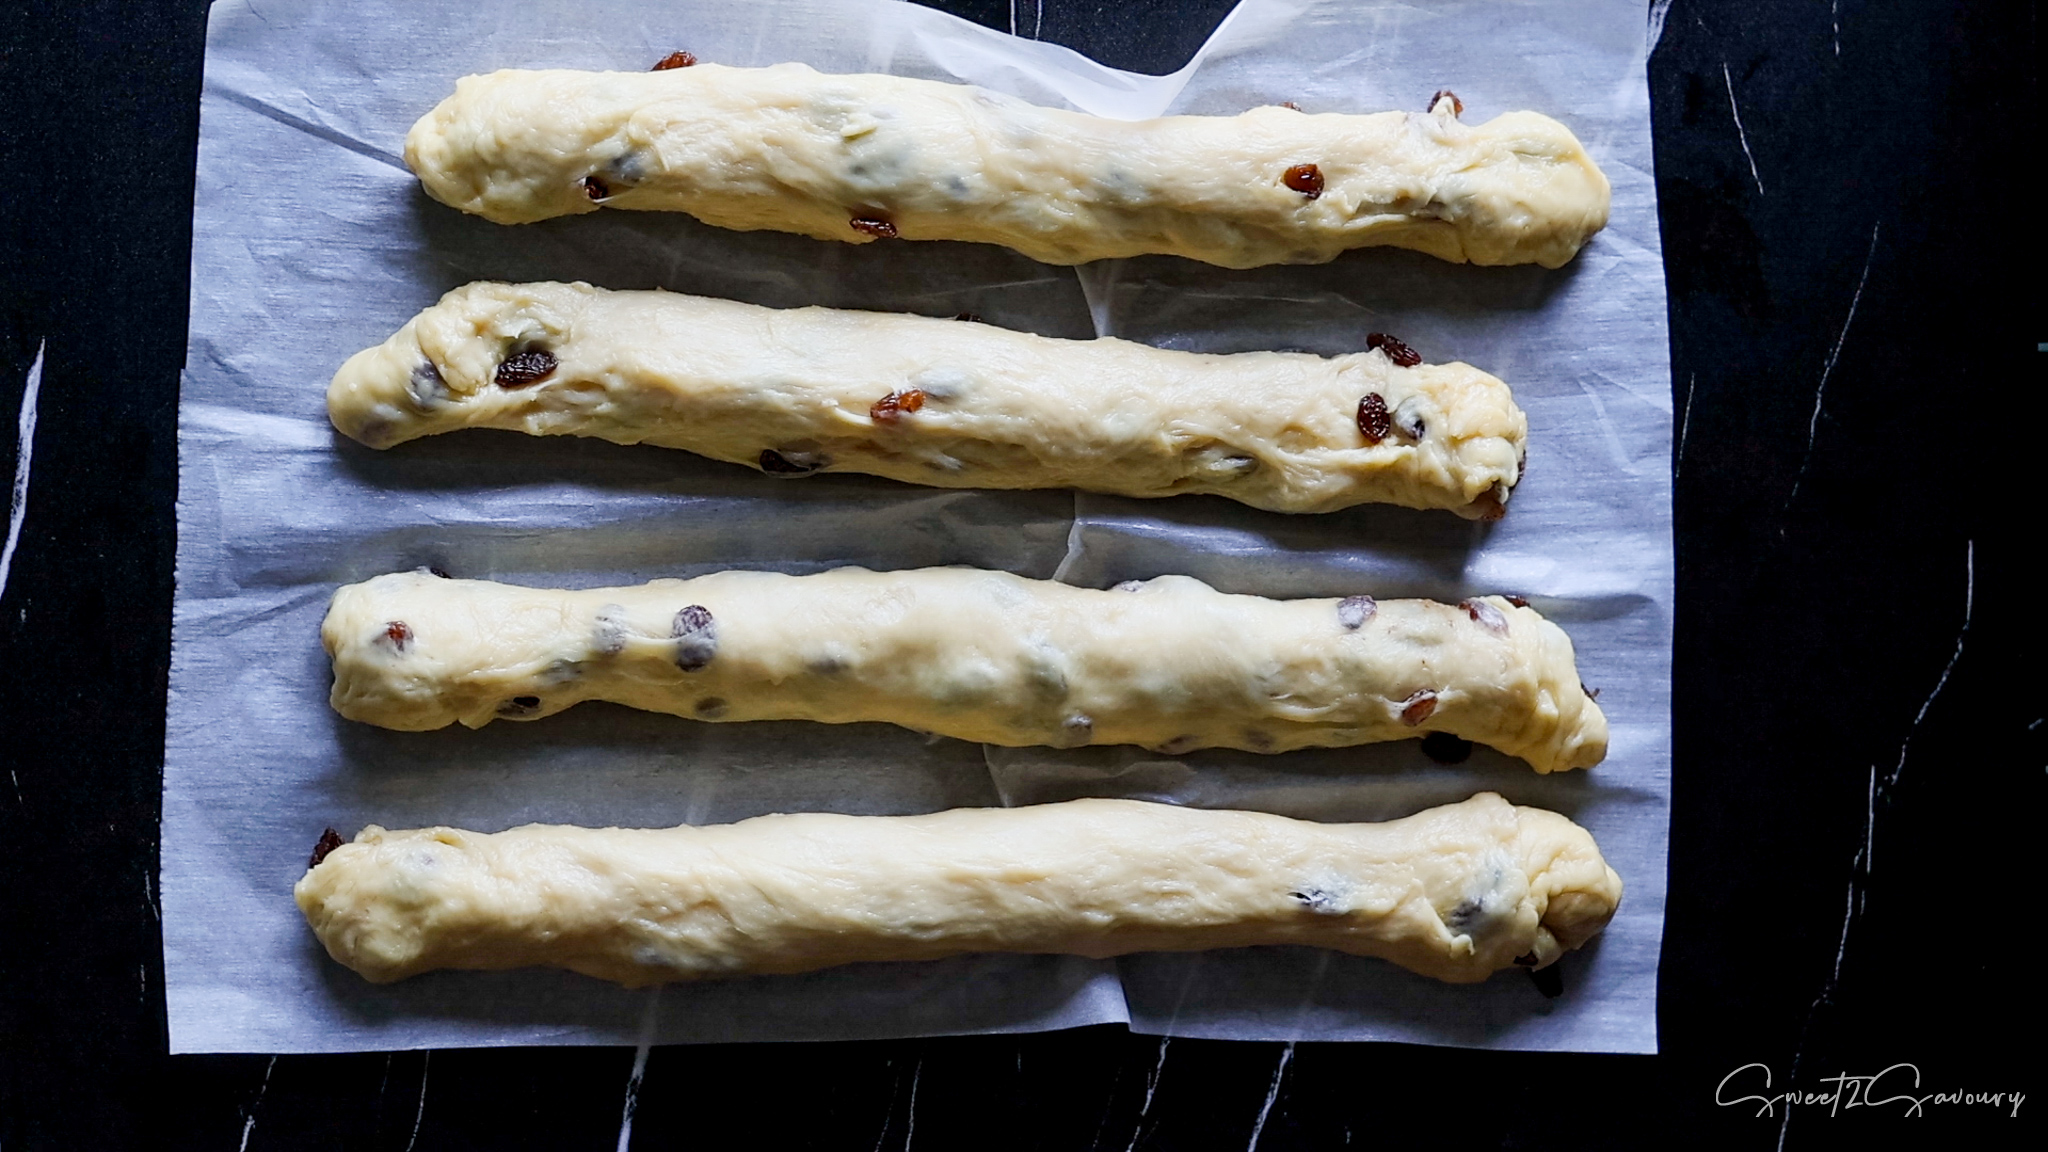
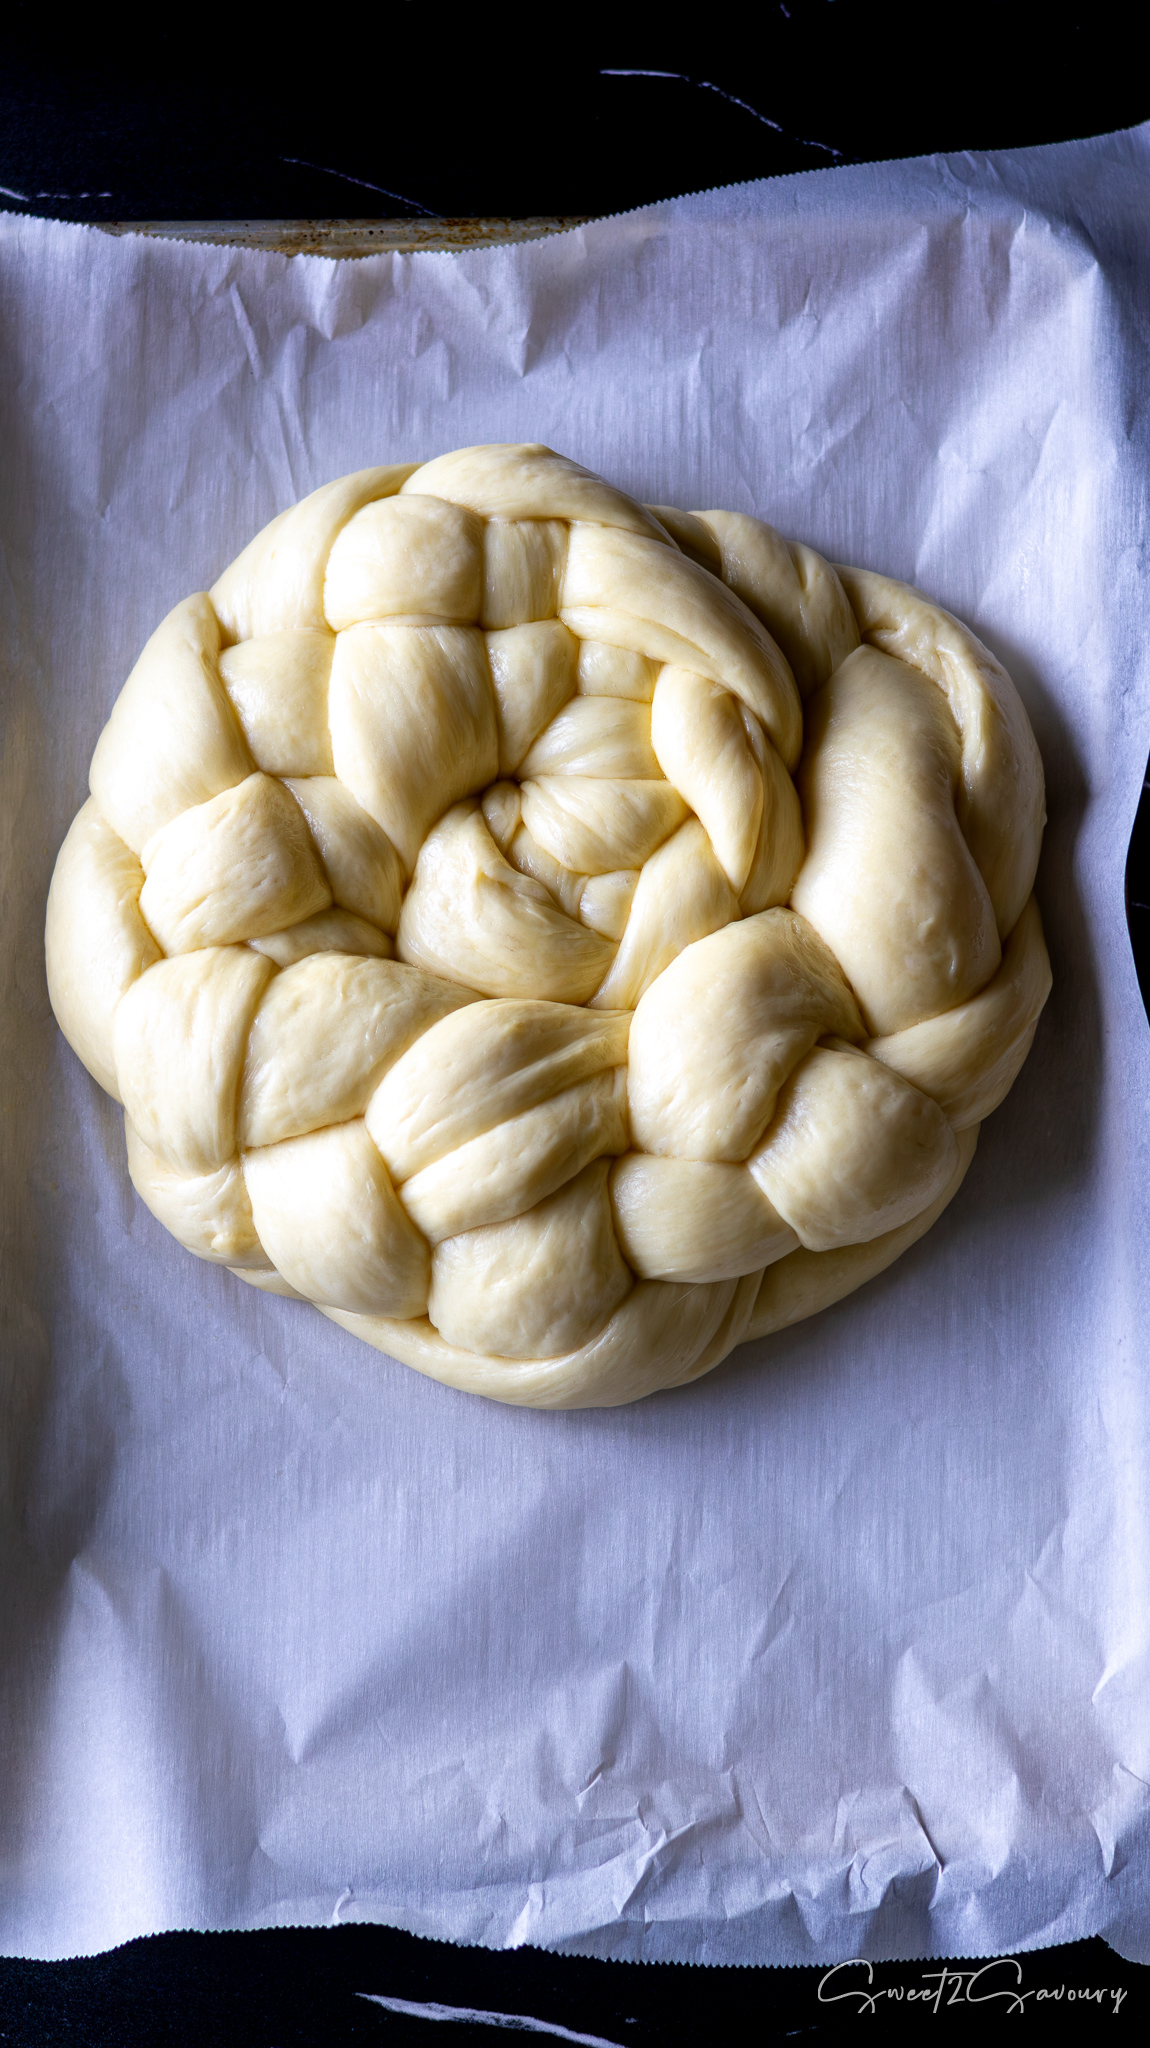
Now we are ready to braid the dough. The number of strands you divide will depend on how many you feel comfortable using for your braid. If you prefer to braid with 3 strands, divide your dough into 3 equal parts. If you like using 4 strands, then divide it into 4 parts.
You can either estimate the portions visually or use a more precise method. I prefer to weigh the total amount of dough and then divide this weight by the number of strands I want to create. In my case, I used 4 strands and divided the total weight by 4 to get equal portions.
Roll each strand until it measures about 15 inches in length (or the length of your baking tray). You can make the strands longer if you want a longer loaf.
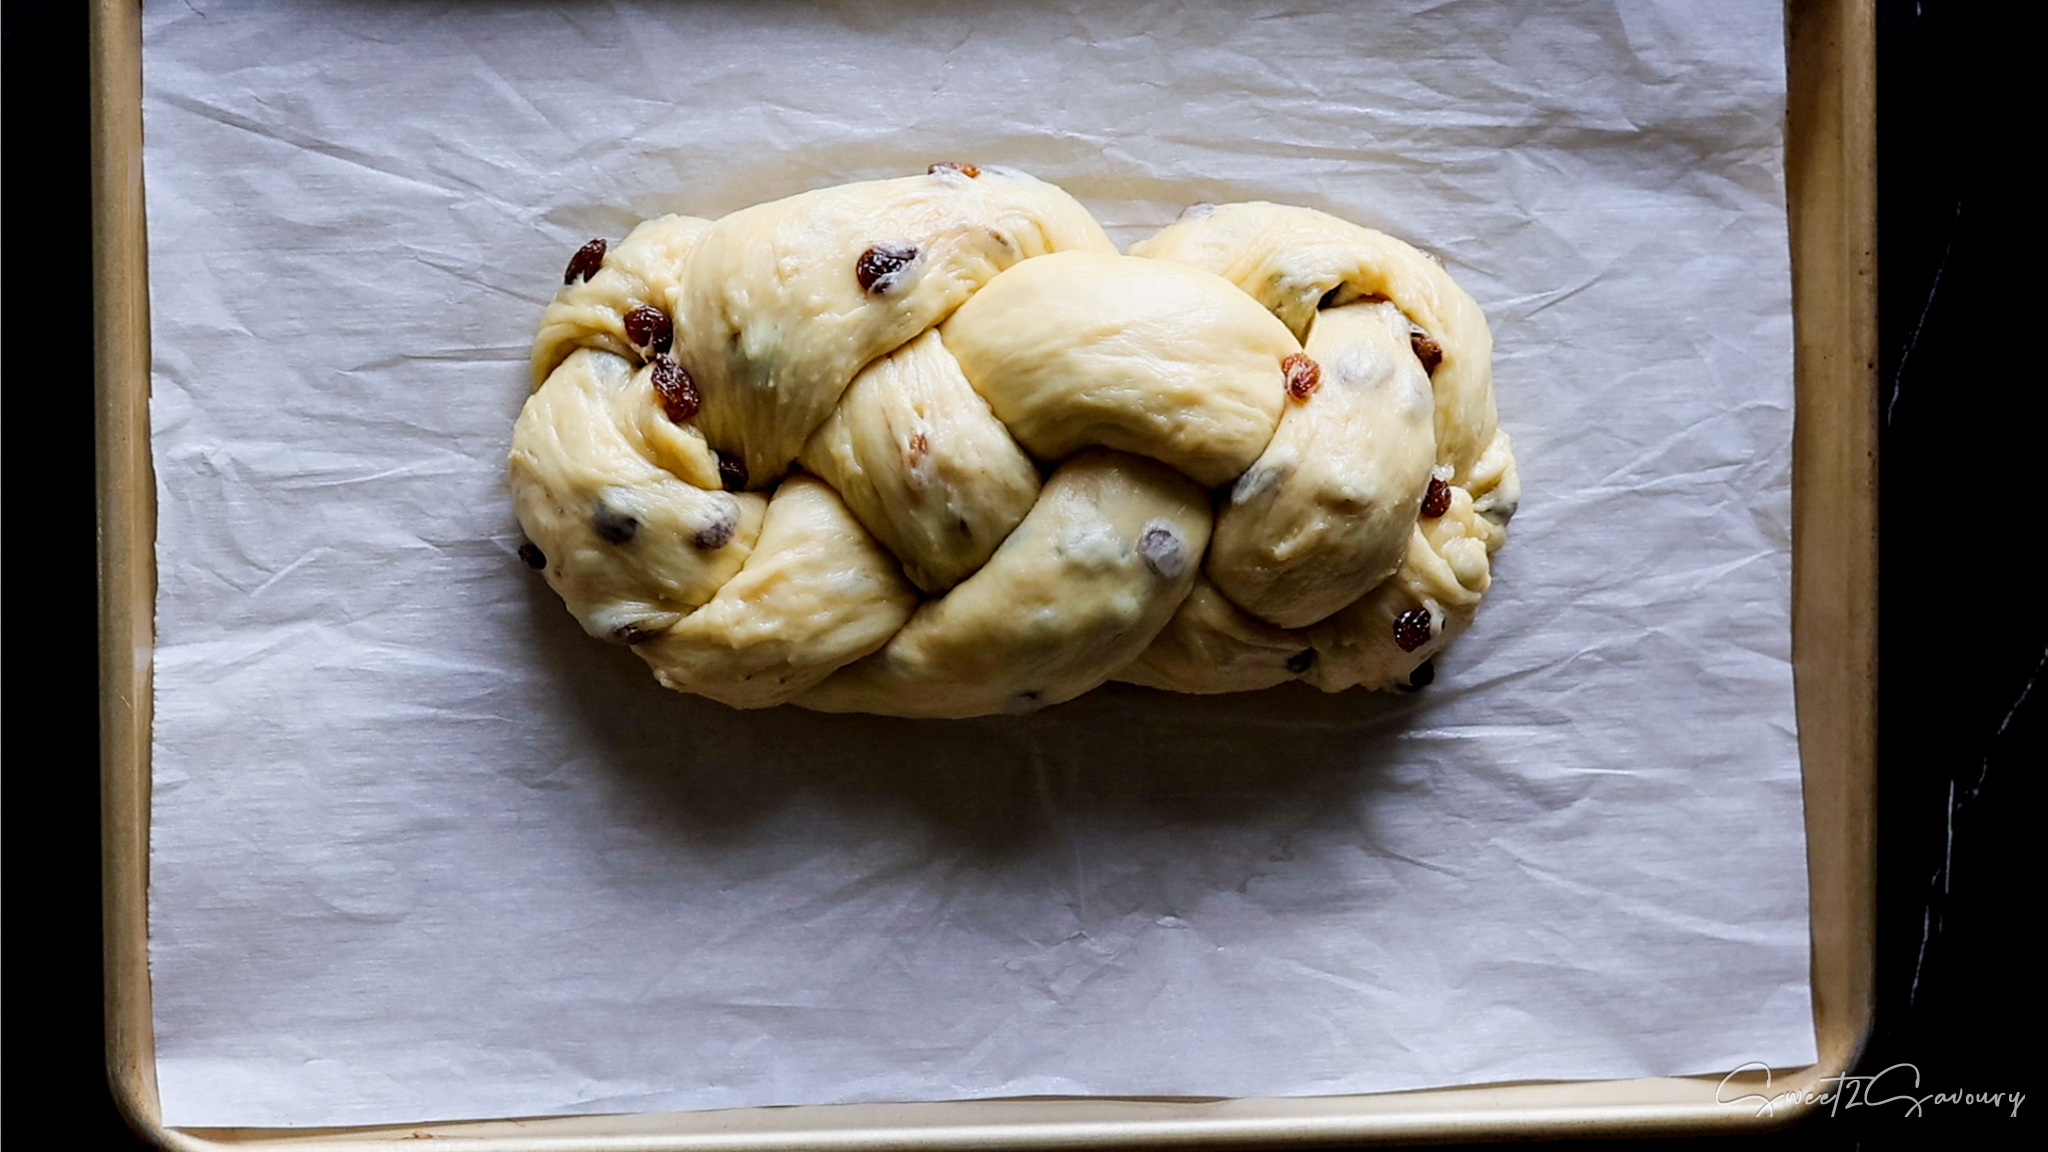
There are various braiding techniques available, so you can choose one that you feel most comfortable with. However, if you’re interested in trying a 4-strand braid, I found a great tutorial online that you can watch here to learn how to do it.
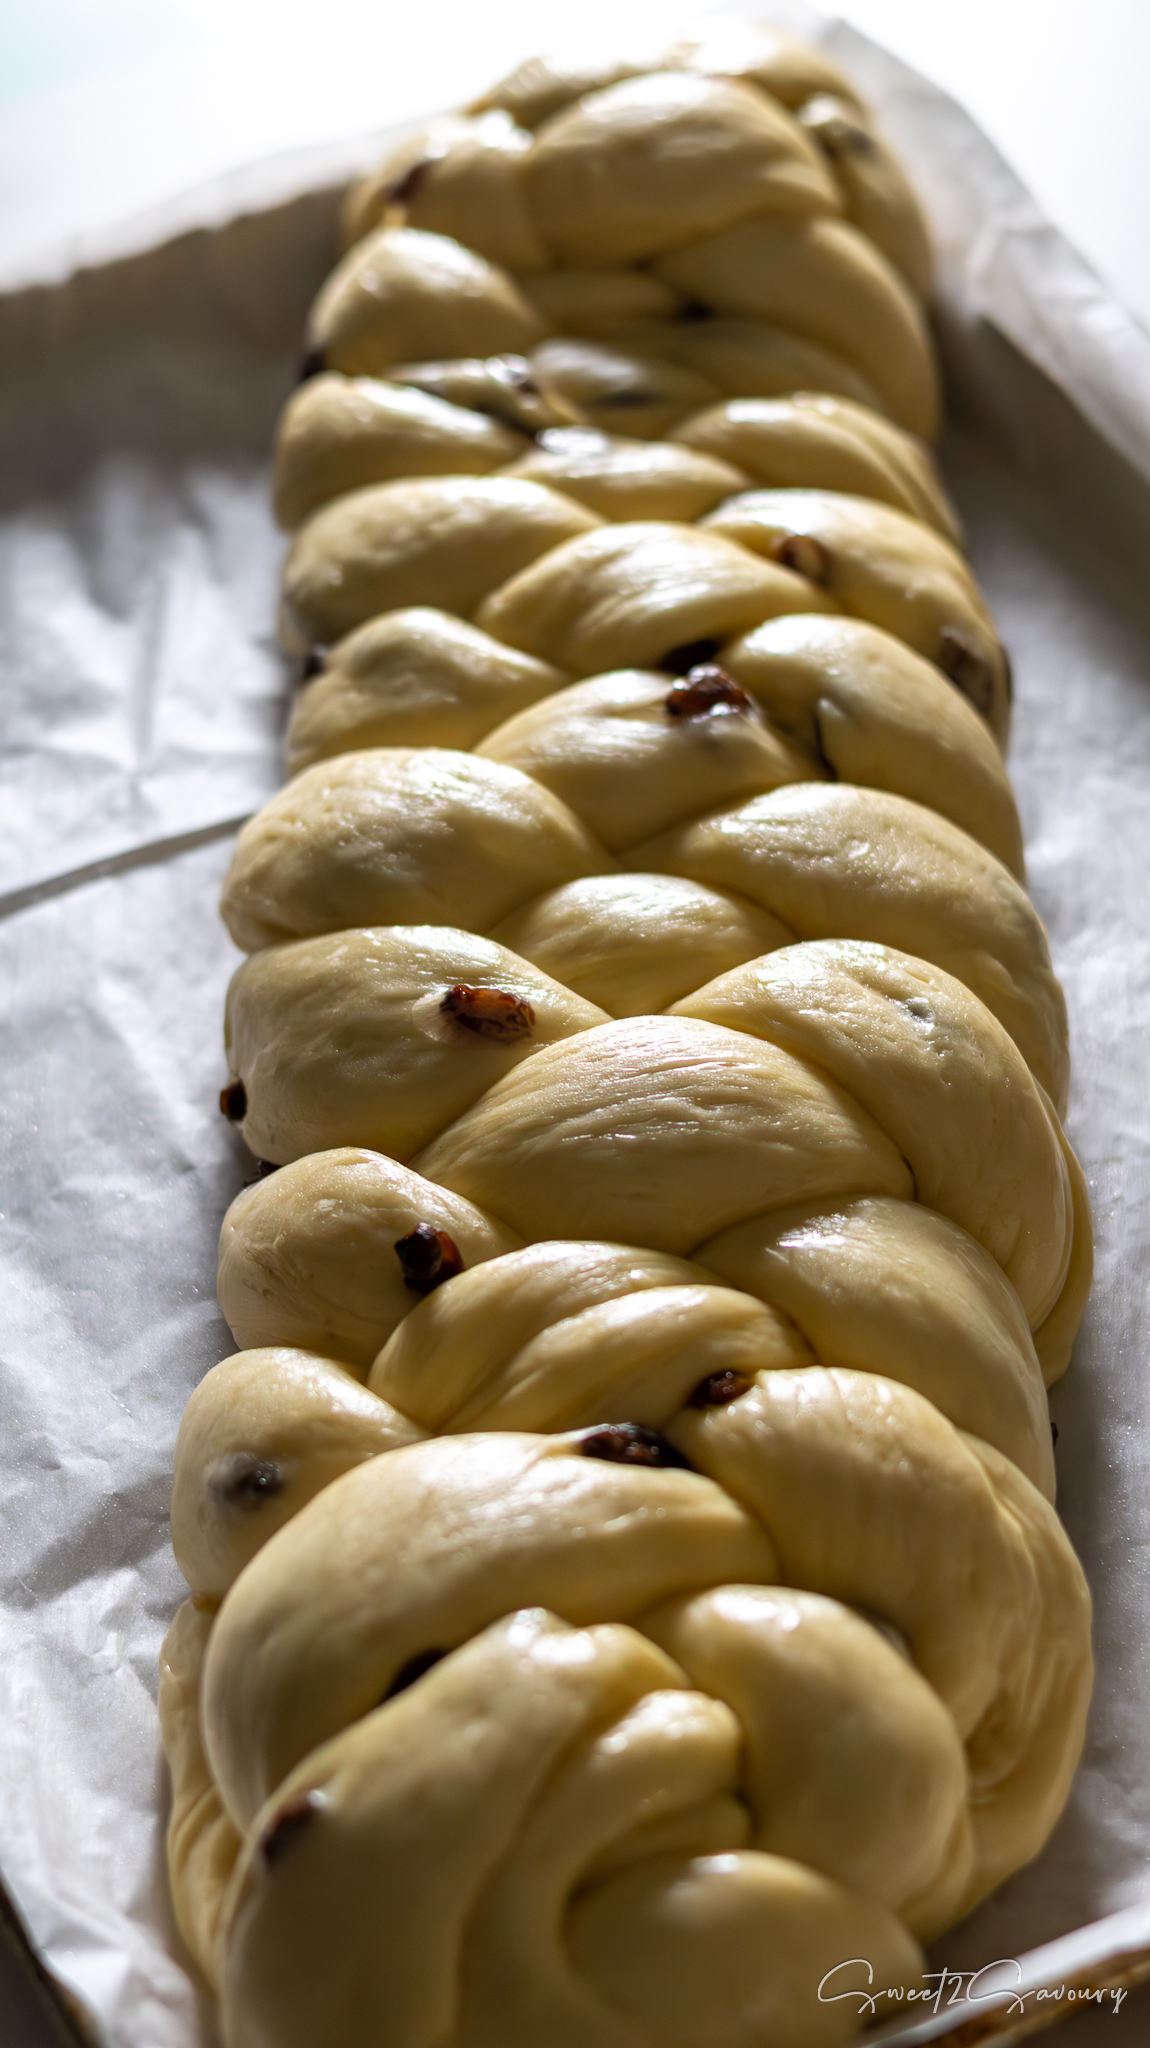
Tuck the ends of the loaf underneath to help keep it secure. Cover it loosely with plastic wrap and a clean kitchen towel, and let it rise until it doubles in size. If you’re preparing the loaf the day before your celebration dinner, refrigerate it while covered. The next day, allow it to come to room temperature and rise for 1 to 2 hours before baking.
Tip
You can be creative and keep the loaf straight and long, or roll it into a round loaf after braiding it, like the test loaves I made (photos below).
Step 5 - Brush & Bake
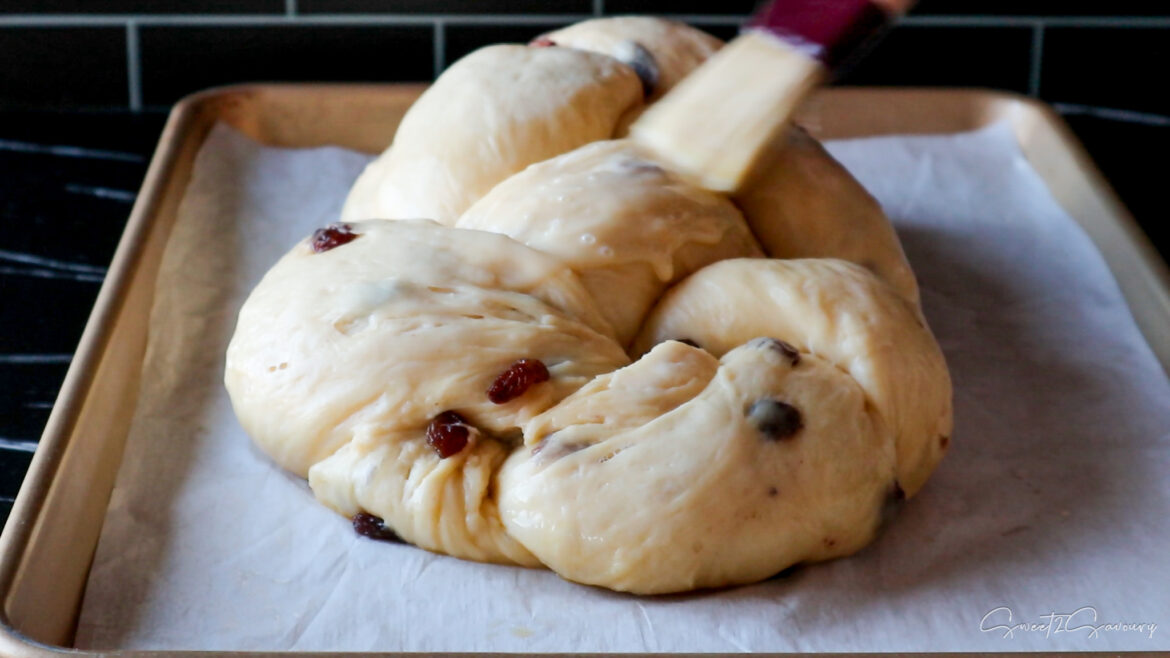
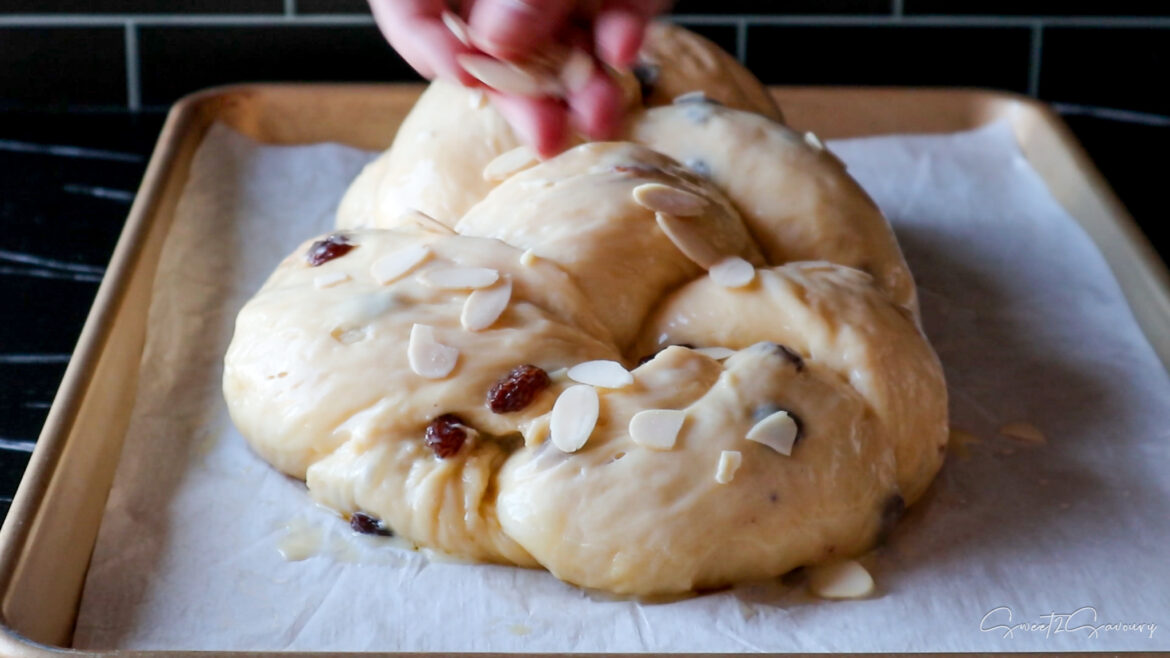
Preheat your oven to 350°F (177°C) with the rack set to the middle. Combine the leftover egg white with one additional egg and 1 tablespoon of whole milk. Lightly beat the mixture, then carefully brush it onto the entire surface of your braided loaf with a pastry brush. Then, sprinkle on as many sliced almonds as you like.
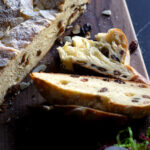
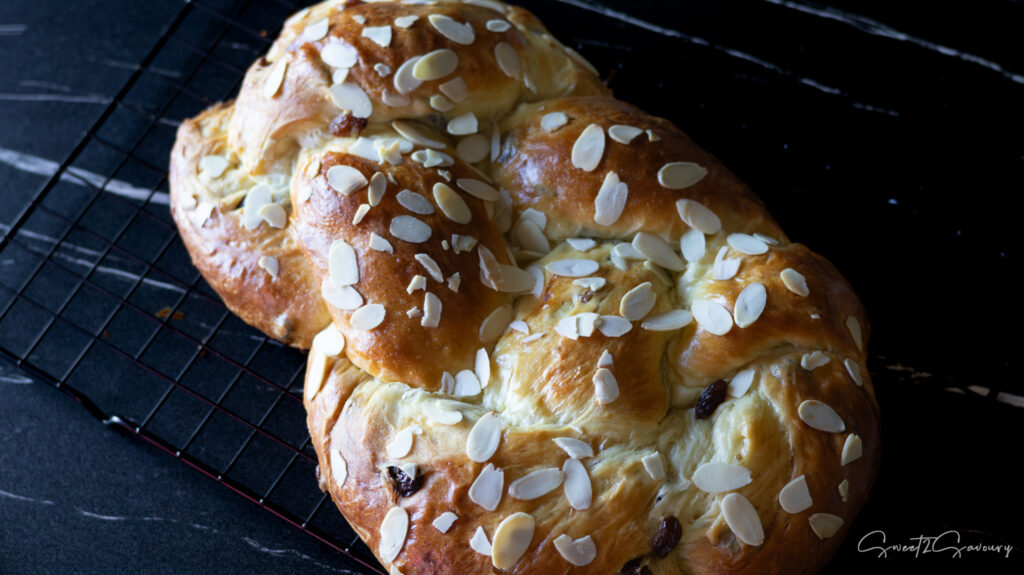
Bake your braided loaf for 15 minutes. Then, rotate the pan 180° to ensure even baking. If the loaf is browning too quickly at this stage, loosely cover it with a sheet of aluminum foil to prevent the surface from darkening too fast. Bake for an additional 10 minutes. Keep in mind that baking time may vary depending on the shape of your loaf. Cool your bread on a wire rack for 15 minutes before slicing it. Savour it on its own, or pair it with butter, cheese, or your favourite toppings!
Pin it for later
If you enjoyed my recipe, please leave a comment or rate it below. Also don’t forget to follow me on my social media channels (YouTube, Pinterest, Facebook, Instagram, TikTok) to keep up with my latest kitchen shenanigans.
Yeast Braid with Raisins, Rum, and sliced Almonds (Hefezopf mit Rosinen, Rum, Mandeln)
Fluffy, golden, and lightly sweet — this traditional German easter bread is the ultimate brunch centrepiece!
⅔cupsunsalted butter, cubed and softened to room temperature
1cupraisins, any kind such as Sultanas or Currants
sliced almonds
Get Recipe Ingredients
COOK MODE – Prevent your screen from going dark
INSTRUCTIONS
Making the dough
Whisk together sifted bread flour and salt in the bowl of your standmixer
In a medium bowl measure the milk and let it sit on the counter to reach room temperature (1 hour). For a quicker option, you can heat the milk in a heatproof bowl in the microwave for about 1.5 minutes. Keep in mind that this time may vary depending on your microwave’s power rating, which typically ranges from 800 to 1000 watts. When finished, the milk should be heated to a temperature between 140°F and 145°F.
Next, add white sugar into the milk bowl and stir until it dissolves. This will lower the milk temperature to about 120°F to 130°F (if not, wait for the milk to cool to this range). It is the ideal temperature for your yeast to thrive.If the temperature is too high, it could kill the yeast. Mix in the instant yeast and wait 5 minutes until a foam appears. (If there is no foam, it means your yeast has expired and is unusable.)
Add the milk mixture to your flour as well as the whole egg, egg yolk, and dark rum. Using a dough hook, mix the ingredients on low speed until they come together to form a rough dough ball. Increase the mixer speed to medium and mix the dough for an additional 2 minutes.
With the machine still running, add the softened butter one cube at a time, waiting until each cube is fully incorporated before adding the next one. The dough will appear very sticky at first, continue kneading it on medium speed until it becomes a smooth, elastic consistency. This process typically takes about 5 to 7 minutes. The dough should be stretchy when lifted but should not stick to your hands. If it's still too sticky, sprinkle in 1 Tablespoon bread flour at time. If it's too dry, add 1 Tablespoon butter at a time.
Once your dough is smooth and elastic, gently knead the raisins in by hand. This technique helps to keep the raisins whole, unlike using a stand mixer, which can crush them and cause their filling to bleed into the dough.
Cover the bowl with plastic wrap and a clean hand towel, then let the dough rise until it has doubled in size. Approx. 1 hour.
Braiding your dough
The number of strands you divide will depend on how many you feel comfortable using for your braid. If you prefer to braid with 3 strands, divide your dough into 3 equal parts. If you like using 4 strands, then divide it into 4 parts.You can either estimate the portions visually or use a more precise method. I prefer to weigh the total amount of dough and then divide this weight by the number of strands I want to create. In my case, I used 4 strands and divided the total weight by 4 to get equal portions.
Roll each strand until it measures about 15 inches in length (or the length of your baking tray). You can make the strands longer if you want a longer loaf. Line a baking tray with parchment paper and use this paper to braid the loaf on.
There are various braiding techniques available, so you can choose one that you feel most comfortable with. However, if you’re interested in trying a 4-strand braid, I found a great tutorial online that you can watch here to learn how to do it.
Tuck the ends of the loaf underneath to help keep it secure. Cover it loosely with plastic wrap and a clean kitchen towel, and let it rise until it doubles in size. If you’re preparing the loaf the day before your celebration dinner, refrigerate it while covered. The next day, allow it to come to room temperature and rise for 1 to 2 hours before baking.
Brush & bake
Preheat your oven to 350°F (177°C) with the rack set to the middle. Combine the leftover egg white with one additional egg and 1 tablespoon of whole milk. Lightly beat the mixture, then carefully brush it onto the entire surface of your braided loaf with a pastry brush. Then, sprinkle on as many sliced almonds as you like.
Bake your braided loaf for 15 minutes. Then, rotate the pan 180° to ensure even baking. If the loaf is browning too quickly at this stage, loosely cover it with a sheet of aluminum foil to prevent the surface from darkening too fast. Bake for an additional 10 minutes. Keep in mind that baking time may vary depending on the shape of your loaf. Cool your bread on a wire rack for 15 minutes before slicing it. Savour it on its own, or pair it with butter, cheese, or your favourite toppings!
Category: Breads & Buns, Breakfast
Cuisine: European, German
Diet: Vegetarian
Keyword: almonds, brioche, challah, raisins, rum
Tips
What type of raisins can I use?There are several types of raisins you can buy, specifically Sultanas, Raisins, and Currants. The main differences among them are the type of grape used and the drying process. Any of these options can be used for this recipe. I chose Sultanas since that is what I had on hand. Just make sure that your raisins are fresh and not too hard in texture. Can I soak raisins in the rum first?If you love a bolder rum raisin flavour, feel free to soak the raisins first! And don’t worry about wasting that delicious rum—just add it to the dough afterward for an extra boost of flavour!What type of Rum should I use? I prefer dark rum for its bolder flavour, but you can use any rum you like. Keep in mind that the sugar content in rum can affect your baked loaf; the sweeter the rum, the quicker it will brown during baking. If you don’t like the taste of alcohol, you can substitute it with rum extract instead.Why do you add butter as the last ingredient after the dough is kneaded?It’s a technique I learned while making brioche that involves adding butter to the dough during the initial kneading, rather than at the beginning when you combine the other ingredients. This method has several benefits: it enhances the dough’s texture and flavour, making it softer and more tender. Additionally, it makes the dough more manageable and can potentially result in a flakier textureYou can be creative and keep the loaf straight and long, or roll it into a round loaf after braiding it.


If you enjoyed my recipe, please leave a comment or rate it below. Also don’t forget to follow me on my social media channels (YouTube, Pinterest, Facebook, Instagram, TikTok) to keep up with my latest kitchen shenanigans.